
![]()
Section 1: Rests and Ties
In Part 1 of this article series we learned how to decipher music notation in time (horizontally) and in pitch (vertically). This duet of understanding makes up the bulk of reading music.
That said, there are still some basic key elements of music notation that are worthwhile to add to your understanding. We may know what notes to play and the counts of the notes that need to be played, we still don’t really know anything about how they should be played: how loud, how short or long, etc. We also could benefit from a few extra pieces of information regarding pitch location and identification. All of this we’ll cover in Part 2.
Let’s revisit our first section of Part 1, where we introduced note values. We learned the different lengths of the notes, how to fit them onto a grid of regular beats, and how to organize them using the time signature. In the second section we learned how to delineate the staff lines into measures that we use to organize note values within the music.
However, there are two key questions we need to ask based on what we know so far about note values:
- What happens when we’re not playing any notes?
- What happens when we need to hold notes longer than a single measure?
Let’s tackle the first of these questions.
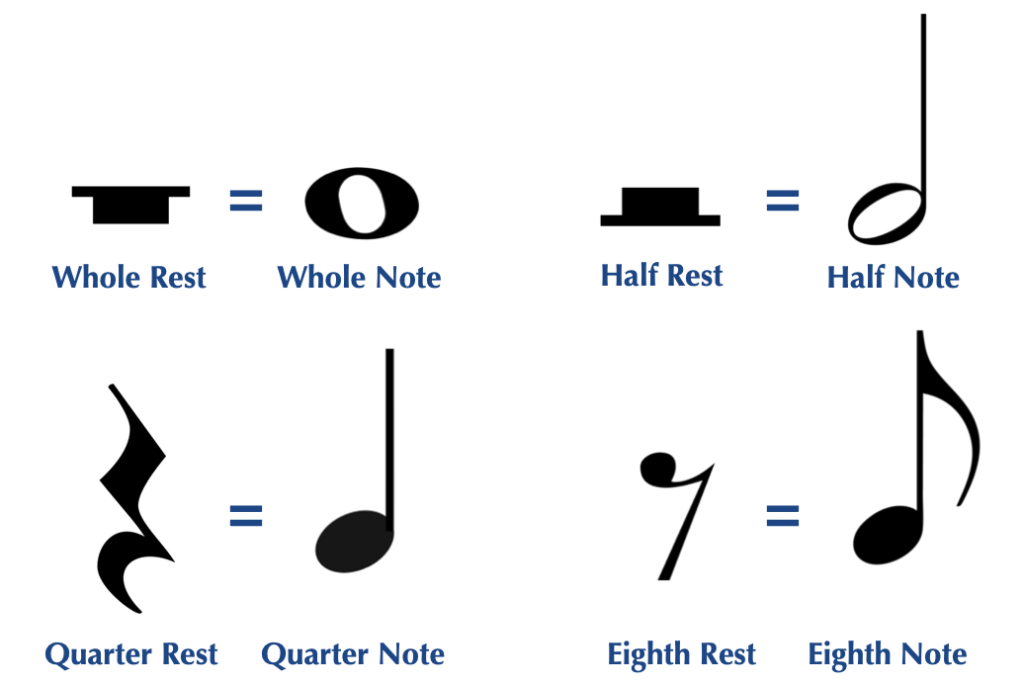
Rests
In “real music” we need to account for every beat in the measure - whether it’s occupied by a note or not. Beats that are unaccounted for (i.e., beats that are not visually occupied by note values in the music) tend to be confusing, so even when we’re not playing anything, we need to use something to fill the space taken up by the beat.
Enter rests.
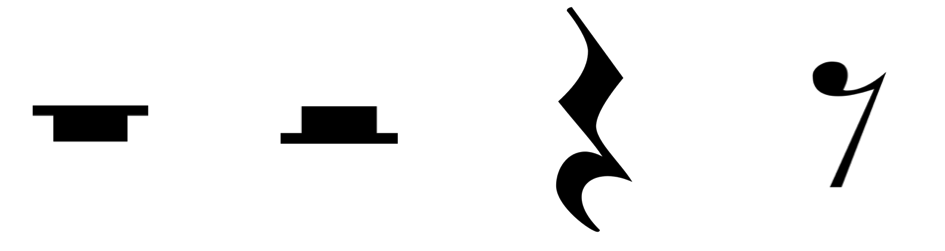
These strange looking symbols are rests, and they indicate spots in the music where no note is being played. The different rest shapes correspond with the different note values. They work exactly like the notes, but opposite, telling us how long to “play silences,” instead of how long to play notes.
Here are the different rests alongside their sibling notes:
Rests take up exactly the same spots in the music as notes do, so if we were to take a phrase like this:

And decide that we didn’t want to play most of the notes, we might re-write it like this:
Now you can see that we have rests substituted for most of our notes. By doing this we can still see the beats in the measures, which helps us keep track of where the beat is if the music is still happening in another staff.
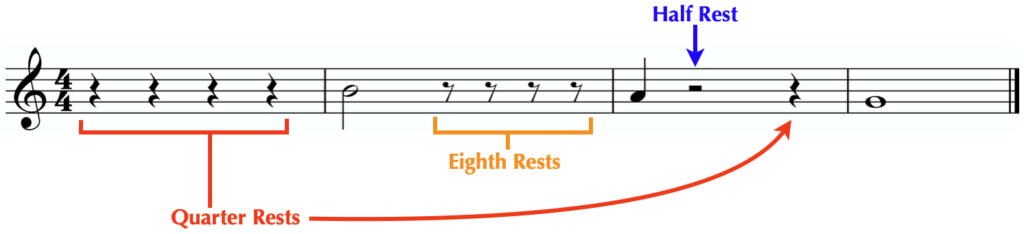
The biggest difference between rest values and note values is that smaller rests can be added together into bigger rests to take up bigger-sized silences in the music. For example, in the passage above, we would probably just replace the four quarter rests in the first measure with a whole-note rest (which takes up four beats), and the four eighth note rests in the second measure with a half-note rest (which takes up two beats). You could even replace the half rest and the quarter rest in the third measure with a three-beat dotted half rest!:

Obviously, we couldn’t do this with notes, unless we wanted to change our shorter quarter notes into longer notes, but then we’d really be changing the sound of the music.
Speaking of longer notes...let's address the second question from above.
Ties
All of the notes we’ve looked at so far have fit within the measure lines (or barlines), and if we’re going to properly keep track of the beat, they have to. The notes in a measure must add up to a sum that is no greater or less than the total number of beats in that measure.
Whew. Math-y.
In other words, if we have four beats in a measure, the only note types we can use must combine to create four beats - no more, and no less. That means a single whole note, two half notes, four quarter notes, two quarter notes and a half note, one dotted half note and one quarter note, etc.
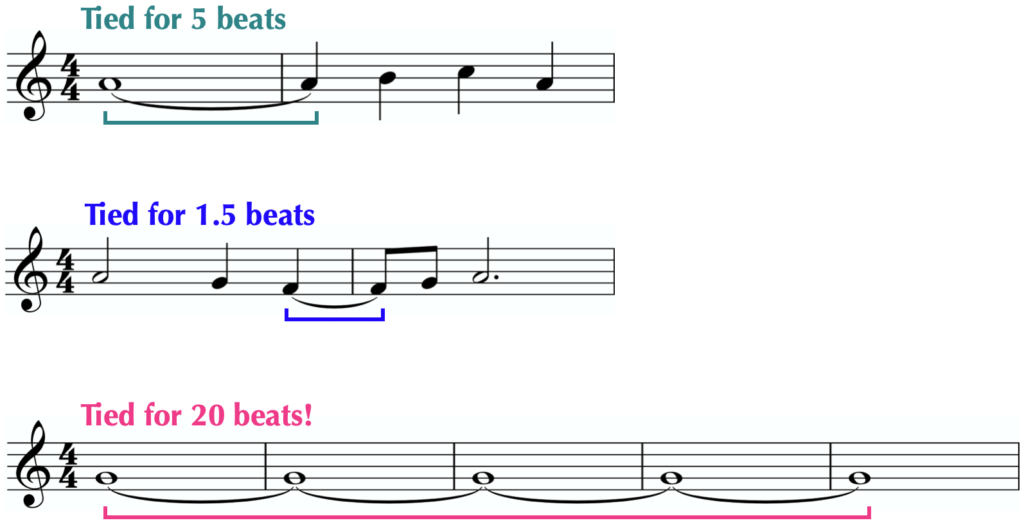
But what if we need to hold a note across a barline? What if we want to hold a note for five beats when we only have four beats in a measure? Or what if we want to hold a note one-and-a-half beats after already using three quarter notes in a four-beat measure? What if we want to play a note that’s 20 beats long?!
Fortunately, we have a simple tool we can use to help us answer all of these questions; we call it the tie.
A tie does exactly what you might imagine - it “ties” together notes so that smaller note values can be combined to create bigger ones.
Here’s what a tie looks like in music:
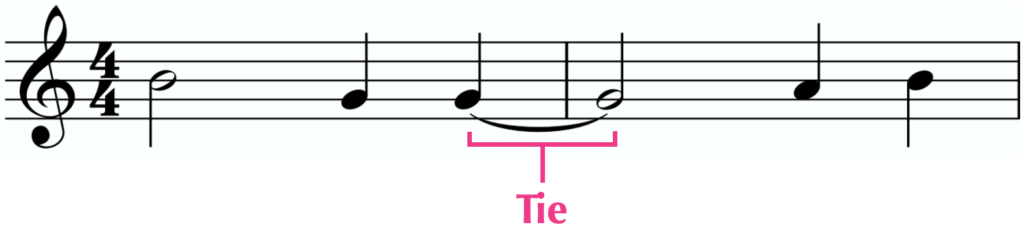
As you can see, it’s a curved line that is connecting this quarter and half note. While there are times we use ties to connect notes within measures, in the beginning you’ll mostly see them connecting notes across measure lines.
Remember the “what if’s” from the paragraph above? Let’s see how they all look when using ties (yes, including the 20 beat note…):
With these additional bits of knowledge (rests and ties) you now have the tools to interpret a majority of the note values and lengths you’re likely to see. Don’t forget though, the real way to learn to read music is by looking at a lot of music, so keep practicing!
That covers what we needed to add to our understanding note values; let’s round out our knowledge of pitch location a bit more.
Section 2: Accidentals
In the last article you learned how to find the locations of the different notes (or pitches) on the staff, using tools like the clefs and landmark notes. As a result, you now know how to find the location of the basic notes on the staff (though you’ll need to practice this to really get good at it!). We call these basic notes the natural notes.
If you’re looking at a piano, the natural notes would correspond with all of the white keys. However, you’ll also probably notice that the white keys are not the only keys on the piano…
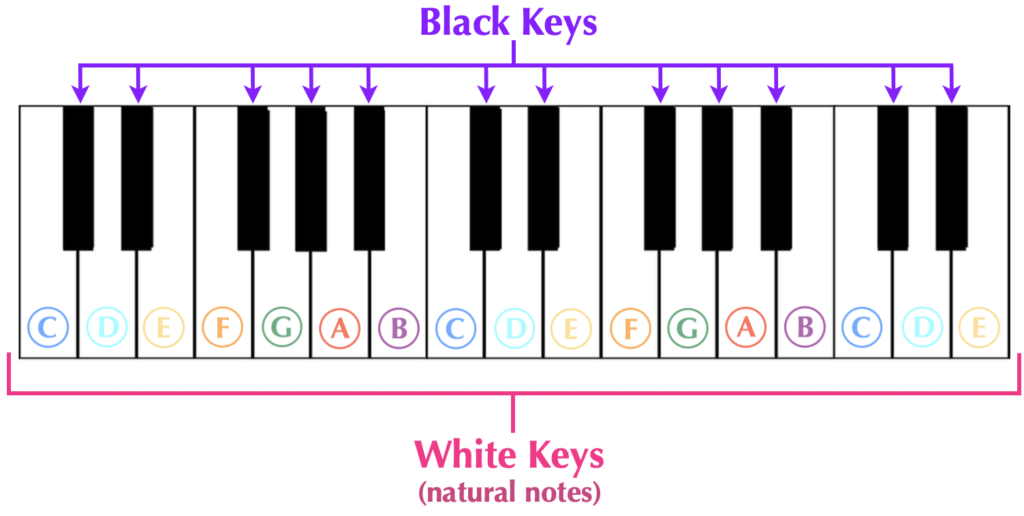
That’s right - what about the black keys?
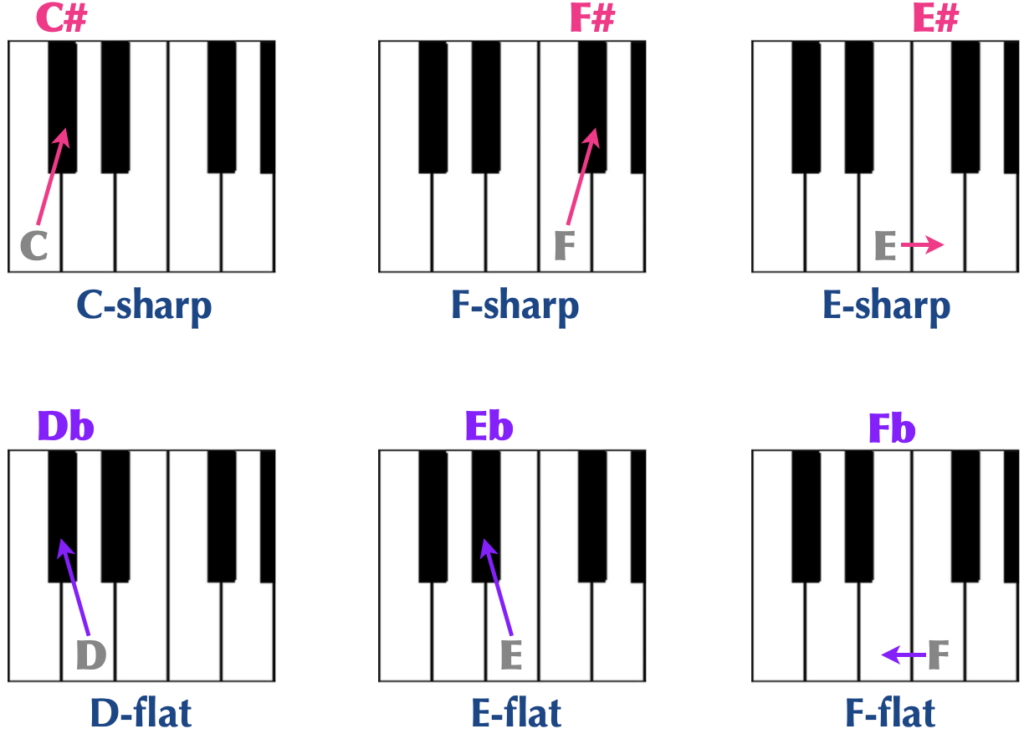
The black keys don’t have names of their own; we have to give them names by starting from a white key (a natural note), and moving to them by either going up/right or down/left by a half step, which is the smallest distance between any two notes on the piano.
To accomplish this we use symbols called accidentals, of which we have three main kinds:
- Sharp: moves a note up/right by one half step.
- Flat: moves a note down/left by one half step.
- Natural: cancels a sharp or flat and turns the note back to natural.

Here are some examples of how sharps and flats move notes on the keyboard. It’s worth it to point out that while using accidentals is the only way to get to black notes, not all accidentals have to be black notes! If the note a half step away is a white note, then that’s the note we get...
When seen in the music, we place sharps, flats, and naturals in front of the note heads (even though when we’re speaking them we put the accidental after the note name).
An important thing to note: whenever a sharp or flat is attached to a note, it stays on that note for the entire measure (unless it is changed back by a natural).
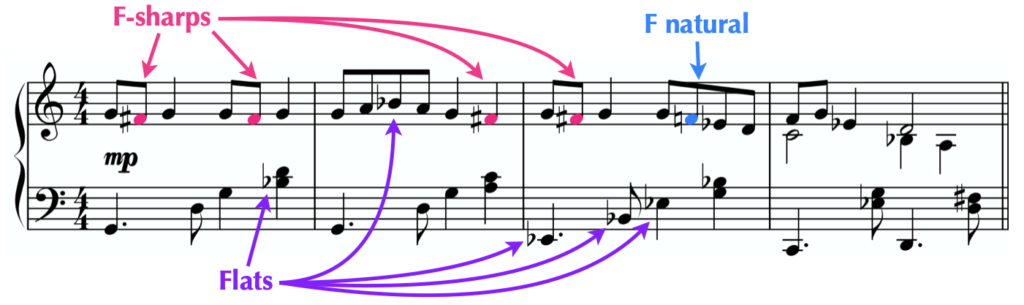
Notice the arrows in measure 1 in the example above for the two F#’s - the second one doesn’t have an accidental attached to it, but it’s still an F#. Meanwhile, the natural on the second F# in measure 3 changes that note back to a natural F.
There are many more things to learn about accidentals and how they work in music notation, but, for now, this is all you really need to know. As a beginning music reader, you’ll start off seeing accidentals slowly, so knowing just the basics is ok for now.
Section 3: Dynamics and Articulations
Ok, so we’ve filled out our knowledge concerning note values, rests, and pitches, but none of that tells us much about how to play the notes.
For that we need to learn about a couple of other musical tools - dynamics and articulations.
In short:
- Dynamics tell us how loud or soft to play the notes.
- Articulations tell us how to emphasize the notes
How loud we play notes and how we emphasize them is an essential feature for almost any piece of music, so it’s worth it for you to get a basic introduction.
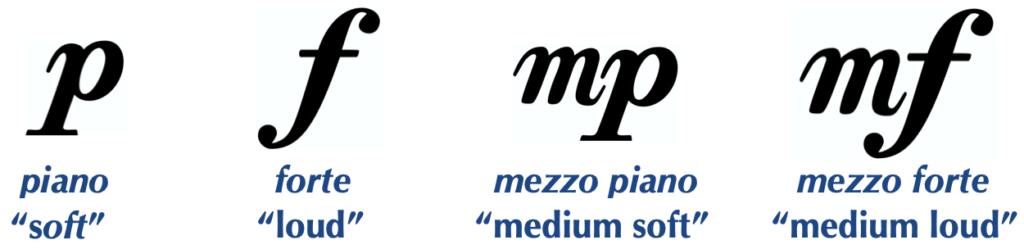
Dynamics use little, stylized letters to reference the Italian words we traditionally use to indicate loud and soft. They’re almost always seen at the beginning of a piece, but are usually found anywhere in the music where a change or reinforcement of volume is necessary.
Here are the four most common dynamics, with their abbreviations, Italian names, and meanings:
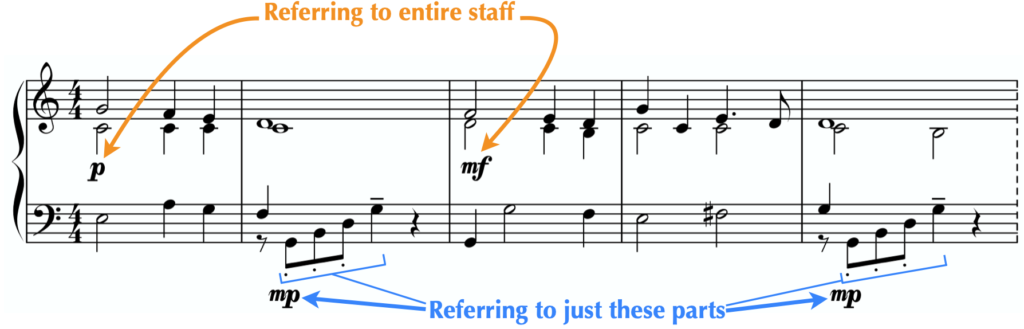
On the grand staff, dynamics are usually positioned in the middle of the two staves, but they can be found in a variety of locations depending on the position of the notes, and whether or not we’re using them to indicate the loudness of the entire piece, or just of a specific passage.
While we often see dynamics letters used by themselves to indicate volume changes, sometimes we specifically want something to get gradually louder or softer. To indicate that in the music we use crescendo (“increasing”) and diminuendo (“diminishing”) marks:

As you get more experience reading music, you’ll discover a number of different indicators for the same kinds of things. For example, while we often see “getting softer” marked by the dim. abbreviation above, we also use the words decrescendo (“decreasing”), or decresc. to indicate the same behavior. The long “alligator mouth” lines seen above are another way of seeing dynamic changes- they are called hairpins.
Here’s how a combination of dynamics might look in real music:

Articulations
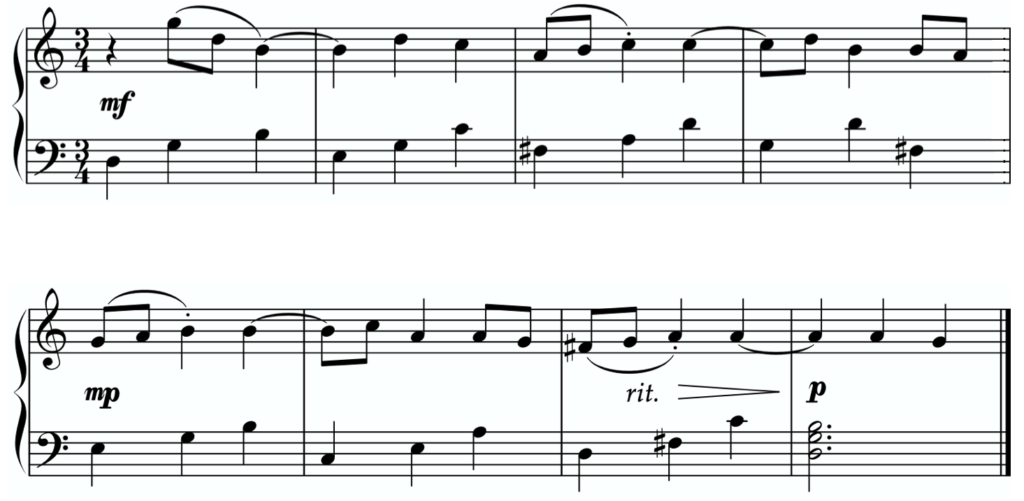
Closely related to dynamics are articulations, which are markings used to tell performers specifically how to play the notes. As with dynamics, articulations usually have Italian names, and are indicated through the use of symbols. There are many different kinds of articulations, but we’re only going to look at two of the most common ones - slurs and staccato dots.
Slurs are curved lines that arch over or under notes:
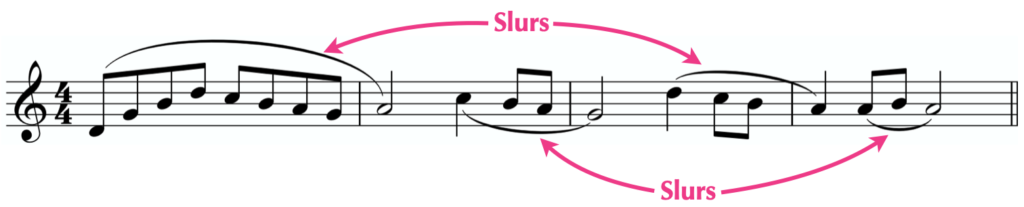
On a very simplistic level, we think of slurs as an indication that we should play legato, or in a smooth and connected manner. This is fine, but the deeper purpose behind slurs is that they clue us in to musical phrases. This characteristic is especially important to instrumentalists who rely on breath or bowing (like singers or string players), as they can use the indicated slurs to strategically plan their performance. It also doesn’t hurt pianists or guitarists to consider slurs for their musical phrase-revealing properties, as recognizing phrases can help you shape the music no matter what instrument you play!
“Hold on,” you may be thinking, “those slurs look an awful lot like ties…”
You’re right! They do. So how can you visually tell the difference?
The key distinction is this:
- Ties connect two notes of the same pitch with no notes in between them.
- Slurs connect notes of different pitches, or any two notes that have notes between them.
Need some pictures? Well you’re in luck...

When in doubt, think about the function - ties hold note values over, whereas slurs show phrases.
Now let’s talk about playing notes short. For this we’ll need another little dot - the staccato dot.
Very simply, staccato dots are dots positioned over or under noteheads (not to the side, like augmentation dots), and they tell us to play the notes short:
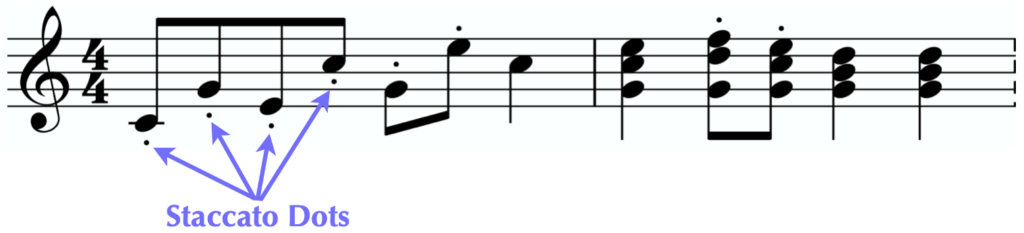
That’s really all there is to it. There may be different ways to play “short” depending on your instrument, the style of music you’re playing, and the specifics of the composition, but in general, when you see a staccato dot, play it short!
We have one final thing to mention before we’re done.
A lot of music (especially the easier music you’re likely to see when you’re just starting), happens at one speed. However, it’s very common to slow down a little at the end of a piece to give it some expressive gravity. While this action is technically a tempo change, because it still qualifies as being “how the notes are played,” we’re putting after articulations.
The Italian word most commonly associated with this action is ritardando, or gradually slowing. We often abbreviate this word rit. when we write it in music:
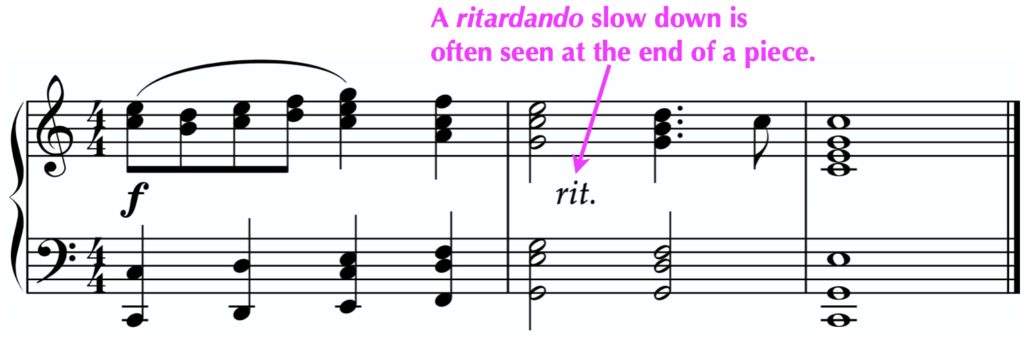
While the ritardando is usually used as a gentle slow down at the end of a piece, it can technically be seen anywhere.
And that’s about it.
Here’s a review of the major terms we covered in How to Read Music - Part 2:
Part 2: Section 1 - Rests and Ties
- Rest: symbol used to indicate a silence that is the length of a given note value.
- Tie: combines the lengths of two notes by connecting them with a curved line.
Part 2: Section 2 - Accidentals
- Natural note: a basic, un-altered note on the staff (the white keys on a piano).
- Half step: the smallest distance between two notes in basic western notation.
- Accidentals: symbols we use to move notes from their notated pitch.
- Sharp: moves a note up/right by one half step.
- Flat: moves a note down/left by one half step.
- Natural: cancels a sharp or flat and turns the note back to natural.
Part 2: Section 3 - Dynamics and Articulations
- Dynamics: how loud to play the notes.
- f: forte (It. strong), play loud.
- mf: mezzo forte (It. medium strong), play medium loud.
- mp: mezzo piano (It. medium soft), play medium soft.
- p: piano (It. soft), play softly.
- Diminuendo (dim.): gradually get softer.
- Articulations: how to emphasize the notes.
- Slurs: indicate a musical phrase (usually means play legato).
- Staccato dot: play a note short.
- Ritardando (rit.): slow down (usually to finish a piece).
After reading these articles, you now have the tools to decipher music like this:
Think you can pick out the things you learned in this example? Here’s another version; see how many of the blanks you can fill in!
![]()
Click on the button below for the answers:
And with that, your core understanding of how to read music is complete!
Well, sort of. You’re still going to need to read music regularly to reinforce your proficiency, but fortunately this is a goal that should easily fit within the scope of your musical ambitions.
So grab some music and start reading! And don’t forget to check out libertyparkmusic.com for more great articles and education resources.
Stay in touch with our newsletter
Useful articles on music theory delivered straight to your inbox!
About the Author: West Troiano

West has over 10 years of teaching experience in settings that vary from private studios to college classrooms. In addition to teaching through traditional forms of piano pedagogy, West frequently produces music and teaching materials that cater to the needs of his students. Check out West's course on Piano Etudes for both beginners and intermediate pianists.


