
![]()
Have you ever wanted to learn to play an instrument, but hesitated at the thought of learning to read music? All those dots and lines and funny little symbols…. it can seem like an alien language, accessible only to the gifted few.
While it’s true that the ability to read music notation (which we’ll refer to simply as “reading music” from now on) can take years of study to master, the basics of reading music aren’t actually that complicated. There are only a few key elements to consider when reading basic music notation, and once you’ve become familiar with those, it’s just a matter of learning to understand them at greater levels of complexity. The gap between reading “Mary Had A Little Lamb” and Beethoven’s Moonlight Sonata might seem vast, but the basic principles of notation between them are the same.
To help you learn the basics of reading music as effectively as possible, we’ve broken this article into two parts: How to Read Music - Part 1, and How to Read Music - Part 2.
In Part 1 we’ll focus on the vertical and horizontal aspects of learning the notes (pitch and time), and in Part 2 we’ll expand on that knowledge by investigating how to read symbols for note volume and note emphasis (dynamics and articulations).
Let’s get started.
Section 1: Beats, Note Values, and Tempo
Check out the image below:
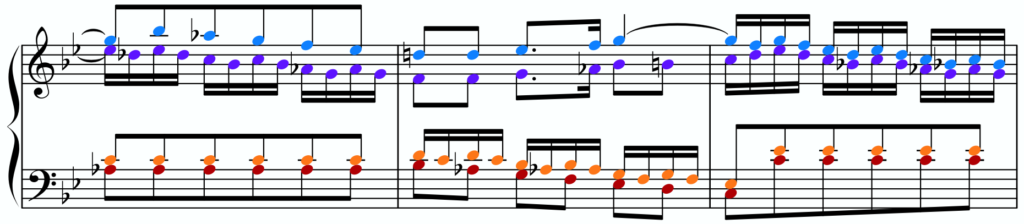
Pretty, right?
You can probably tell right away that this is an image of music notation, but look at all those colors, it’s almost like a piece of art…
What’s the biggest difference between looking at this as a piece of art and regarding it as music notation? Yes, it’s true, reading it as music notation implies that it’s supposed to be played by an instrument, but think deeper - what’s the key difference between viewing a piece of visual art and playing a piece of music?
Time.You can view a work of visual art for a second, a minute, or an hour, but a piece of music usually has a fairly specific amount of time in which it occurs. That amount of time may vary depending on the speed at which the music is taken (called the tempo), but the variations are small.
Beats
To help us measure the amount of time passing in a piece of music, we usually use a grid of regular pulses, called the beat. Ever heard a band leader call out “1-2-3-4!” right before the band comes in? That’s the beat.
Nearly all music happens over a regular beat. We’ll talk about how we measure beats in a little bit, but for now, let’s simply acknowledge that the beat is the essential groundwork for measuring the tempo of a piece, and that the notes we play have to fit into the beat for the piece to work.
Note Values
This brings us to the first important feature of notes we need to learn - note values.
Note values are the relative lengths of the notes compared to one another when played within a beat.
Whoa. Ok, let’s look at some pictures to help us unpack that a bit.
Here is a musical note:
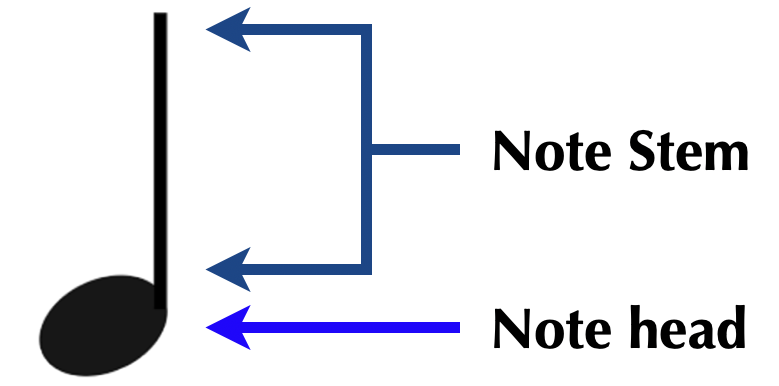
You’ve probably seen musical notes before, but just to recap; a musical note in western notation is usually an oblong shape, sometimes filled in (like the note above), sometimes open, and sometimes with a small line attached to it called a stem. Sometimes stems have little curved flags attached to them, and some stems are connected together with thicker, horizontal lines called beams. Really though, all we need to know for now is the basic, open or closed note head with a stem.
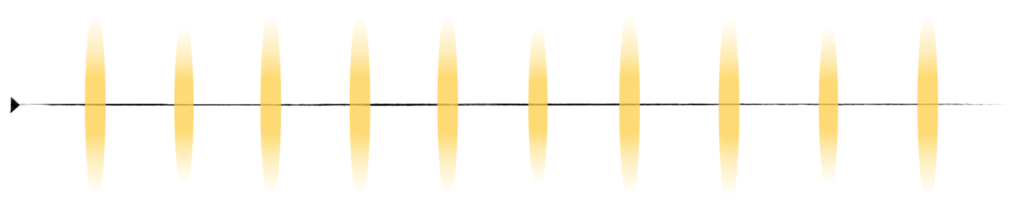
Let’s create a visual representation of a regular pulse, which we’ll call our beat grid. Pretend like each yellow line below is a sound from a snap, clap, or drum hit:
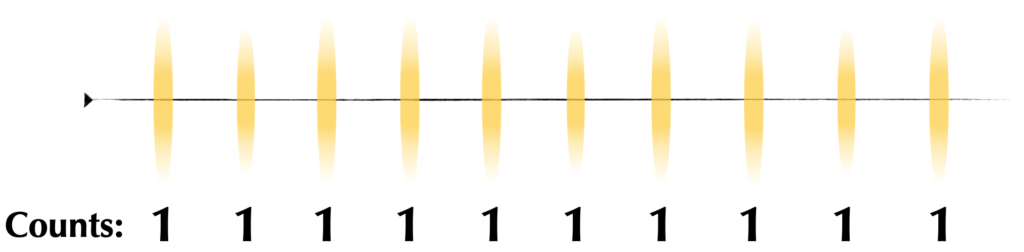
In a lot of music, we consider the pulse to be one beat, or one count. So we would think of each of our beats as one count, like this:
In many cases we think of the note seen above as being attached to the “one-beats” of our beat grid. We count it as one, and that’s how we think of it when listening to our beats:
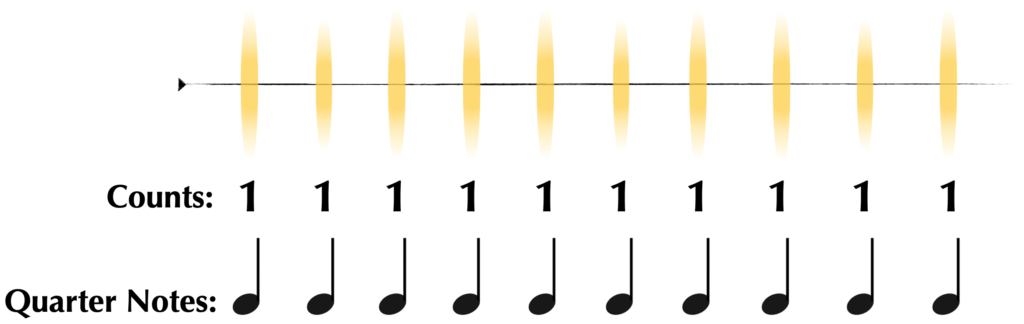
We call this particular note a quarter note, and we’ll talk about why that is in a moment.
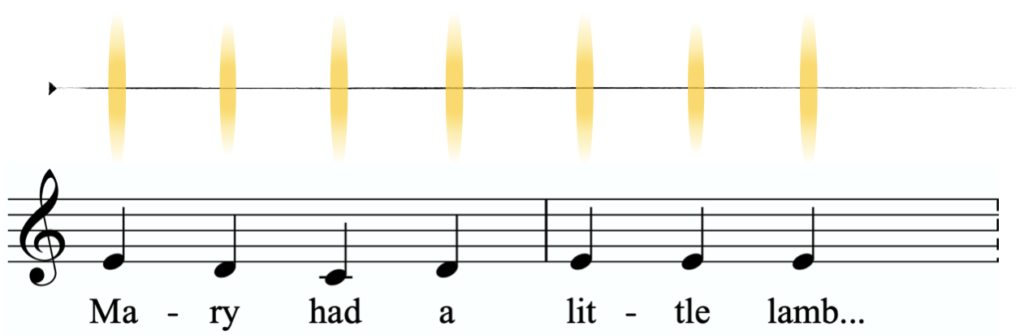
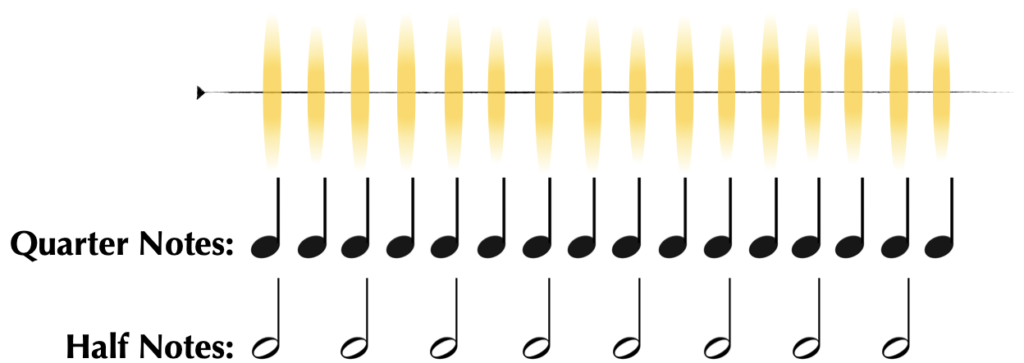
Let’s place our beat grid under a popular melody so that we can see what a continuous line of one-beat quarter notes looks like in music. Don’t worry, you don’t need to know anything about what the notes are yet, just think, “Mary Had a Little Lamb…”
Wait a minute though - doesn’t “Mary Had A Little Lamb” have some pauses or long notes or something?
Indeed it does, and for that we’ll need to add a new note value to compliment our one-beat quarter notes…

This is a half note. If a quarter note is one beat on our beat grid, then a half note takes up two beats, like this:
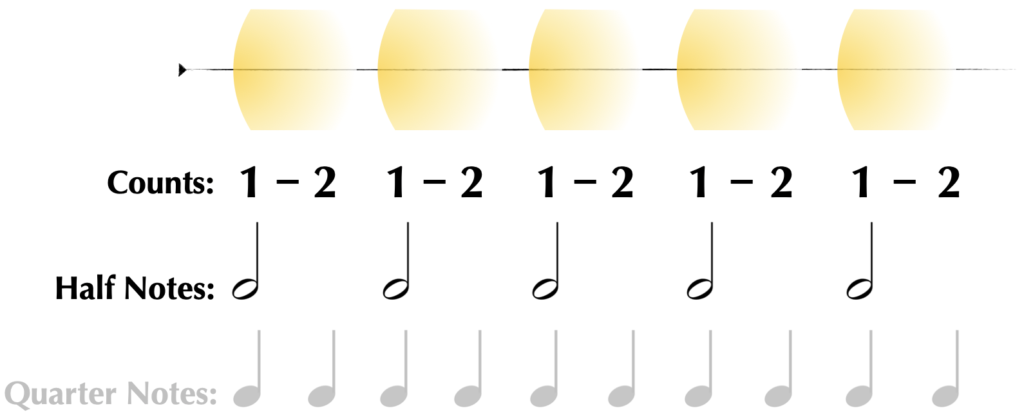
Notice that we count a half note “one-two, one-two,” instead of just “one, one, one…”
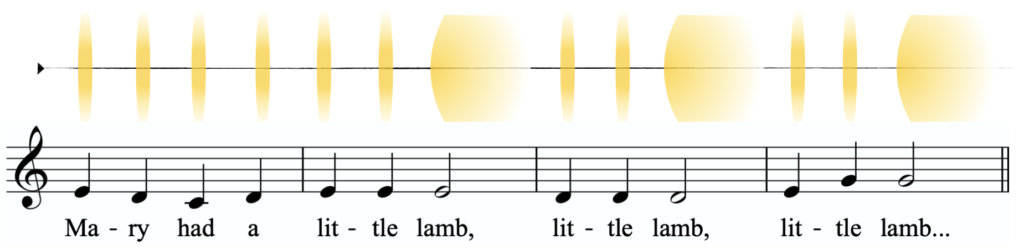
When we add the two-beat half notes, the melody looks like this:
The most important thing to take away from this is that, no matter what the speed of the piece, each note value will stay the same: one beat for quarter notes, and two beats for half notes.
So, even if our beat gets really fast and tight, like this:
Or really slow and stretched, like this:
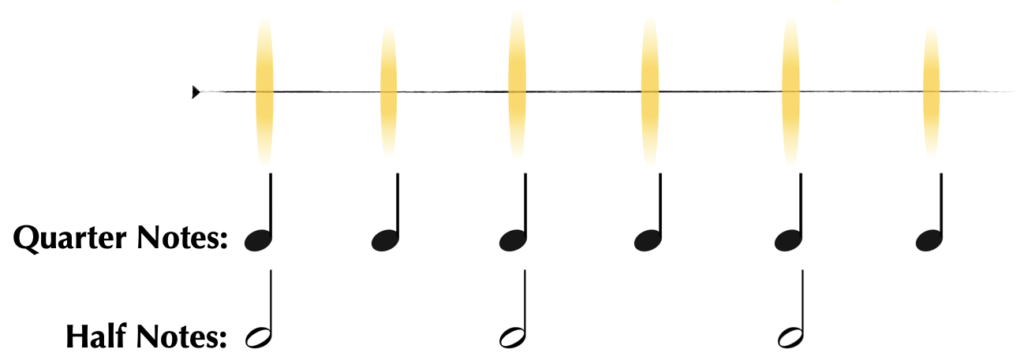
Quarter notes will always be one beat, and half notes will always be twice as long (two beats).
This is one of the most challenging and important things to understand about reading music. Once you understand this, the rest will make a lot more sense.
Basic note values are measured via a fractional system - bigger note values equal bigger fractions, while smaller note values equal smaller ones.
We’ve already seen notes corresponding to one quarter (¼) and one half (½), so what would be the next step bigger?
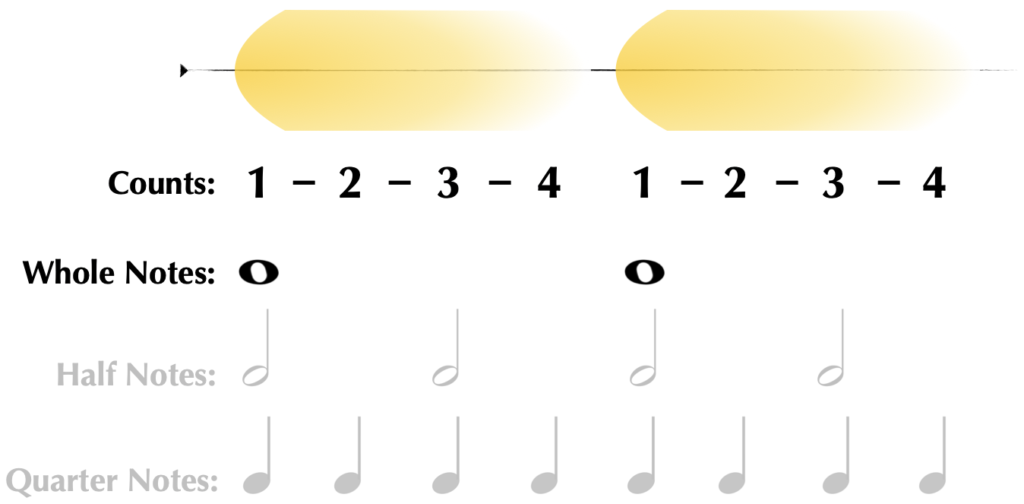
The big open circle note above is called a whole note, and it takes up a full four beats. Is the name of the quarter note starting to make sense now? Four quarters equals a whole, right?
You may have noticed that our note values are getting bigger in multiples of two, but what if we wanted a three-beat note?
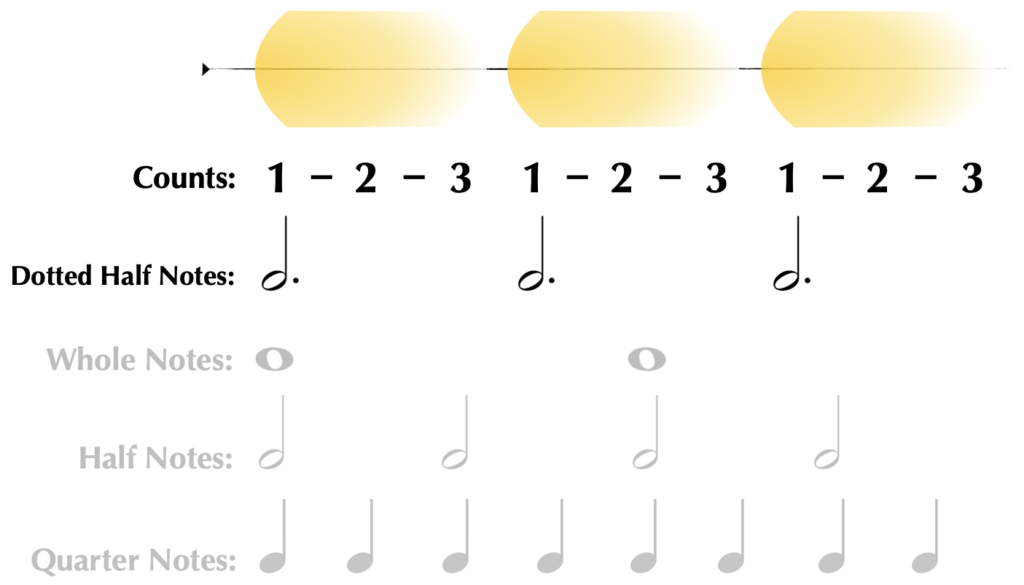
It may look like adding a dot to the side of a note (as you see here with this dotted-half note) just adds another beat to a note, but the reality is a bit more complex. A dot (properly called an augmentation dot) added to the side of any note increases its value by half. This is not really important at the moment - for now, just stick to understanding the basic note values, and the rest will come later.
Let’s add one more note value to our little library, this time in the opposite direction…
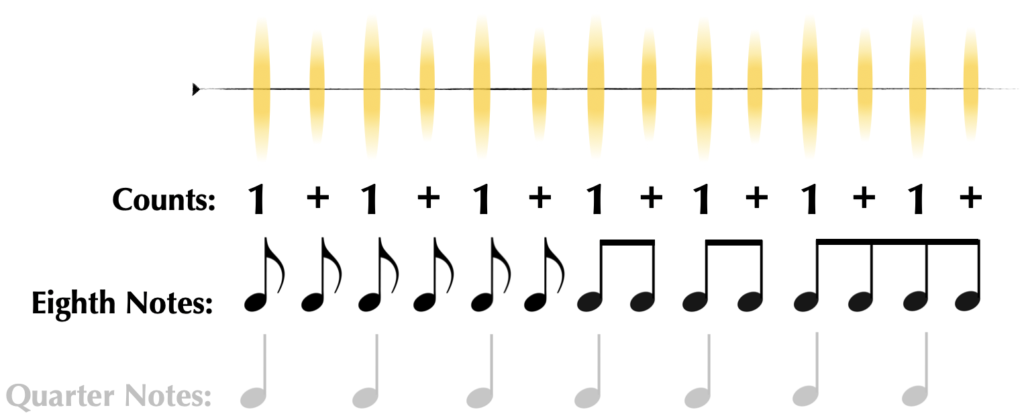
As you can see, now our note is smaller than the quarter note - smaller by half, to be precise. These are called eighth notes (⅛), and they split our one-beat quarter notes in half. The little plusses are spoken, “and,” so eighth notes are counted “one-and, one-and, one-and...”
Notice that we see the eighth notes here with both flags and beams. The only difference between the two is that we usually see flagged eighth notes when they’re alone, and beamed eighth notes when they’re featured in groups. Both are provided here for example.
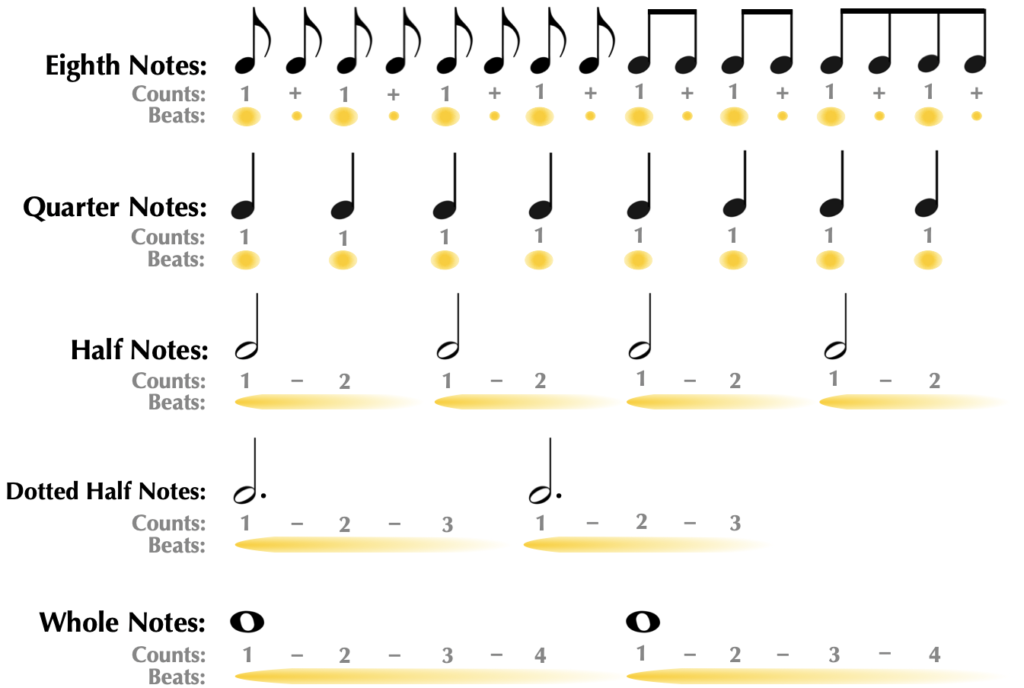
Let’s take a look at all the note values we’ve seen so far with the beat grid, and with their names and counts included:
Time Signatures
There are two more things we need to introduce before we can move on.
If every musical beat grid was arranged as just “one-one-one-one” things would get pretty confusing pretty quickly. To help with that, we usually use a repeating count of beat groups. The beat groups are usually in either four or three, and are indicated with a stacked series of numbers found at the beginning of a piece, called a time signature.

So, two numbers - why two numbers?
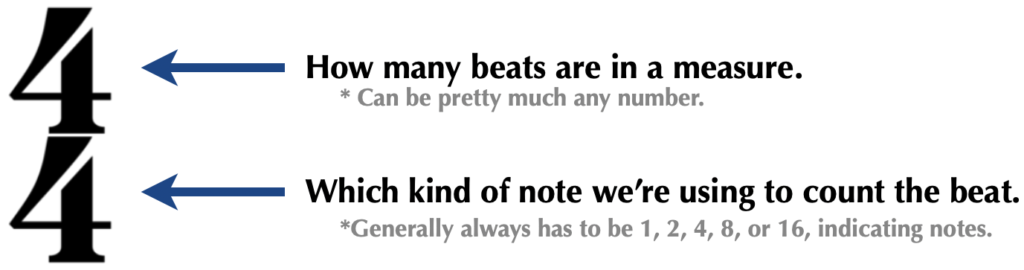
The top number of the time signature is easy - it tells us how many beats are in each group. (If you already know what a measure is, then this is the number of beats within each measure. Everyone else, stayed tuned, we’ll get there shortly!) This number can pretty much be anything, but it’s usually 4, 3, or 2, and sometimes 6.
The bottom number is more complicated, but if you’ve been following along, you should be able to understand it without too much trouble - it tells us the kind of note we’re using to count the beat. This number is like a nickname. Think back to the fractions from earlier - “4” equals ¼ for a quarter note, which is the number shown here and the most common note to count a beat with, but it can also be “2” for a half note (½), “8” for an eighth note (⅛), or even “1” for a whole note (!).
Altogether, we read the time signature like this:
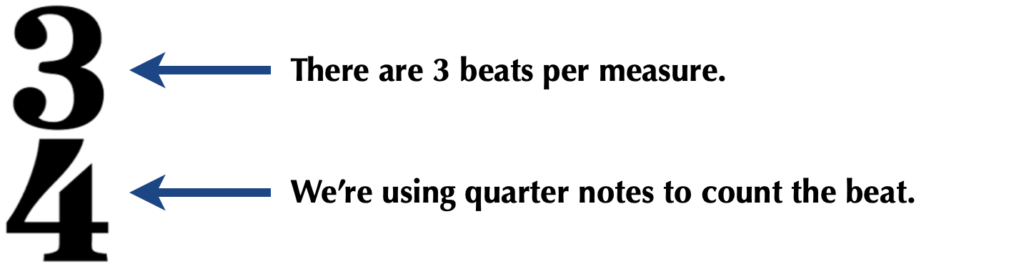
Here’s another one with different numbers, just to make sure you’re got it:
It’s important to remember that everything we’re talking about is meant to help us organize musical notes in a logical way so that our brains can more easily interpret them for music reading.
The Staff
Another thing we do to help keep notes organized is to place them on a different kind of grid, this time made up of stacked horizontal lines. We call these lines the staff:
![]()
We read the staff from left to right, and also up and down:
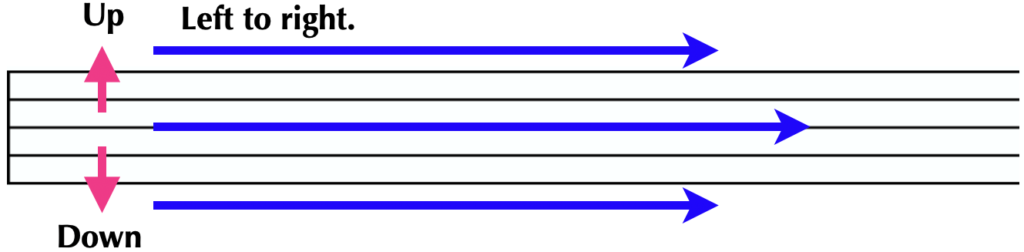
When reading the staff left to right, we like to cut it into segments to help keep track of the notes. This is where the time signature it comes into play:
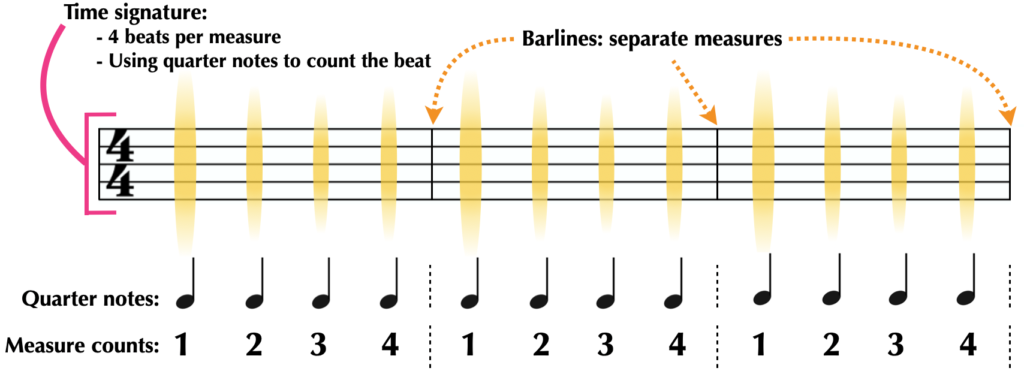
When we overlay our beat grid onto the staff and place the time signature at the beginning, you can see that we cut our staff into sections, each “measuring” the same number of beats. We call these sections measures (or bars), and they are separated by barlines. Now we can easily see the layout of our beat grid.
Barlines come in a couple of different flavors; for now you only need to know about the normal ones (seen above), the double barline (which signals the end of the piece), and the repeat sign (which indicates that we should go back and repeat a section).

How’s your brain? Here’s the good news - that’s the hard part. Now we can move on to the much more conventional task of figuring out how to find pitches on the staff.
Section 2: Notes on the Staff
Before we begin, it should be pointed out that different countries have different ways of naming the seven notes of our primary, diatonic Western scales, but for this article we’ll be using the first seven letters of the English alphabet: A-B-C-D-E-F-G. It’s also important to mention that, while we’re using the word “notes” to indicate the placement of musical tones on the staff, the real word for the sounds themselves is pitch. We’ll continue using the word “notes,” but just keep in mind that what we’re really doing is using the notes to place different pitches higher or lower on the staff.
There are lots of ways to figure out what the different notes are on the staff, but we’re going to focus on the methods we can use with the tools we’re given at the beginning of a piece of music:
![]()
What you see above is the beginning of a grand staff, which is the kind of staff usually used in piano music. This staff has a higher section of notes, and a lower one. Using the grand staff we can see the full range of basic note locations.
Clefs
The two funny-looking symbols resting on the staff lines are called clefs. They tell us where the notes are on the staff. They do this by indicating the placement of one special note (called a landmark note), which we can use to figure out the location of the other notes.
While the two different staves of the grand staff (the upper and lower set of lines) look like they’re separated by a big gap, there’s actually only the distance of a single extra line between them.
In other words, while we usually see the grand staff spaced out as in the image above, the real distance between the staves looks like this:
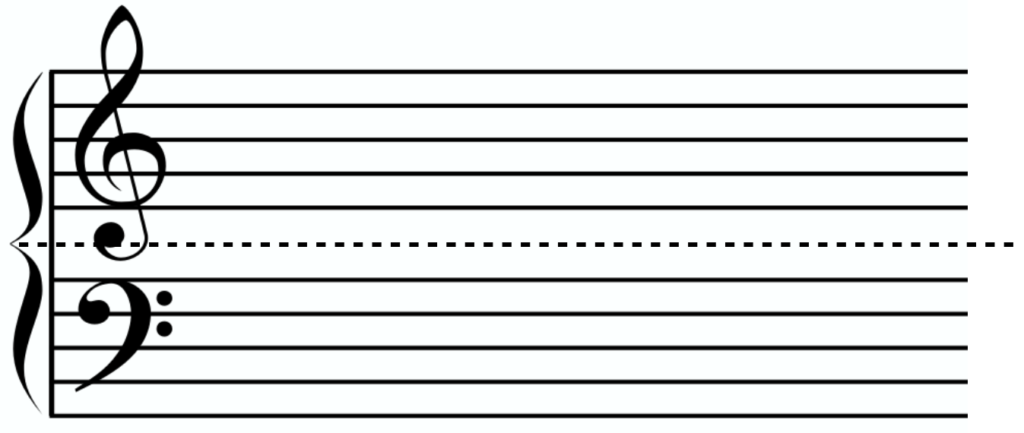
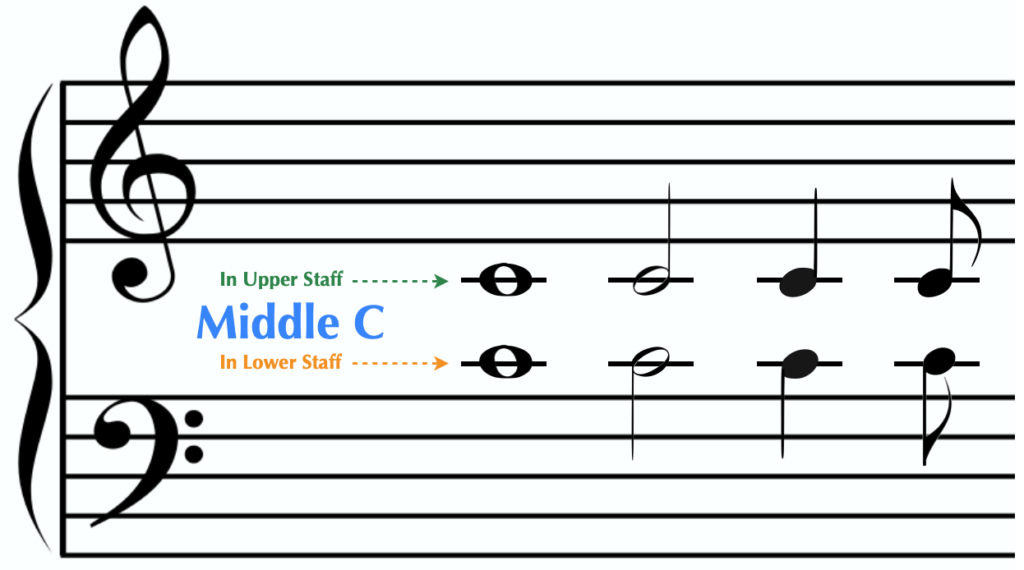
We stretch this space between the two staves so that we have room to put other pieces of musical information (like dynamics, lyrics, or other notes), but it’s really only the size of one line. And the note that goes on that line, right in between the upper and lower staves, is middle C. We don’t see the whole line when we write in middle C, but a shortened version of it called a ledger line, which can appear either below the treble clef staff, or above the bass clef staff:
Let’s talk more about the clefs.
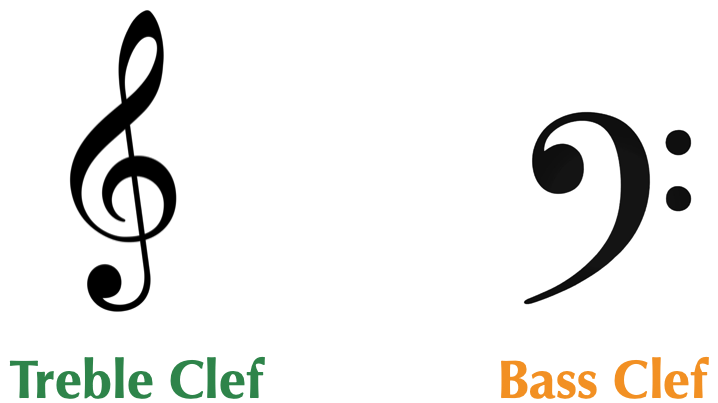
The clef on the upper set of lines in the grand staff is called the treble clef, while the bottom one is the bass clef:
The clefs visually clue us in to where the landmark notes are in two ways, one very literal, and the other a little more imaginative.
The imaginative way is this: look at both of the clefs - if you use your imagination a bit, can you see the clefs as letters? This may take some doing, but see if you can make the leap…


As it turns out, using the clefs as actual letters on the staff was the original method of indicating note locations, but over time the symbols became so stylized that we really don’t think of them as letters anymore. What hasn’t changed is the way the clefs visually indicate where their landmark notes are on the staff.
For the treble clef, look at how the circular part has a straight line crossing through it, and that it seems to be “targeting” the second horizontal line up in the staff:
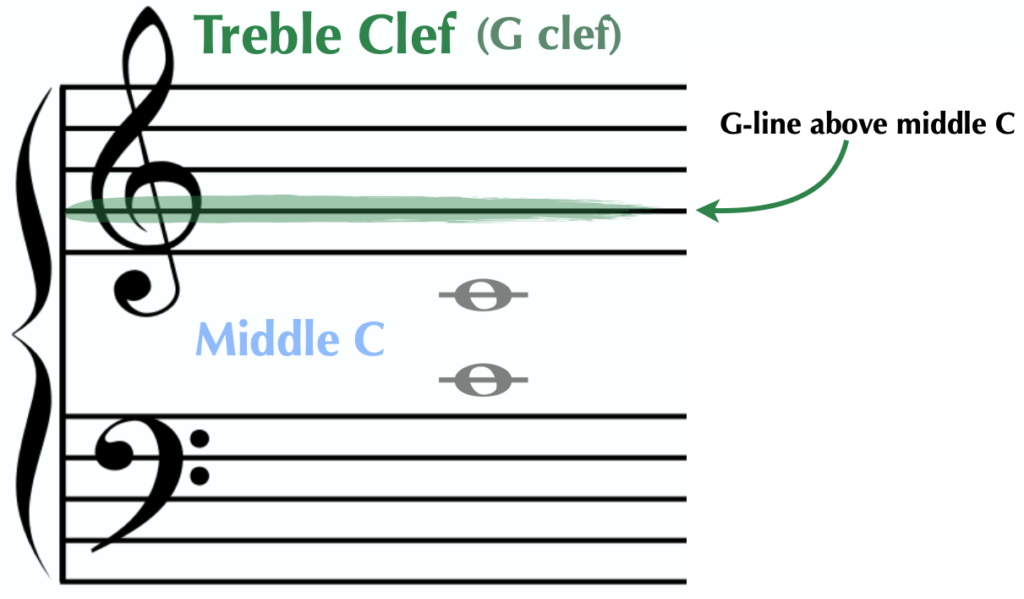
This, as you can see, is the G-line. More specifically, it’s the G-line above middle C. Because of this landmark note and the implicit shape of the clef, we commonly refer to the treble clef as the G clef.
Let’s do the same thing for the bass clef.
For the bass clef you probably needed to stretch your imagination even more to see the letter “F,” and finding the location of the landmark note it points to also requires a little extra effort.
See the two little dots on the right side of the curve? If you find the line that goes right between them…

This line is the F below middle C. As with the treble clef, the combination of the landmark note location and the visual characteristics of the bass clef often result in us calling this the F clef.
Clefs
Let’s look at treble G, bass F, and middle C all together with whole notes (remember, middle C is notated twice so that we can see how it looks in both treble and bass clef):
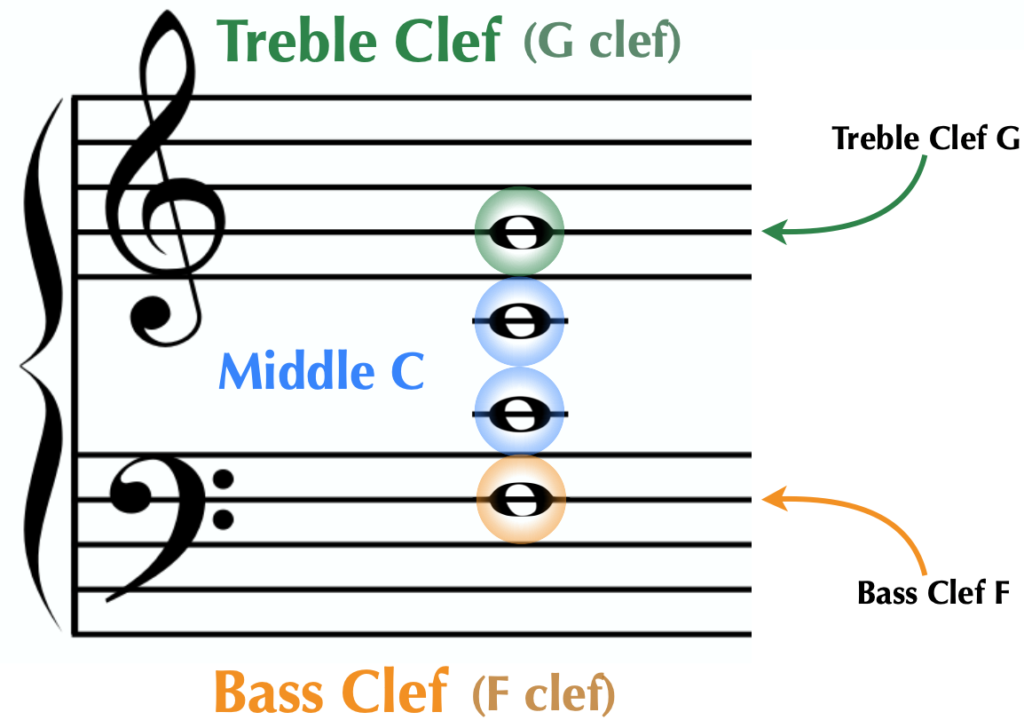
Think of these three landmark notes as your anchor points; they are the notes you should put the most effort into memorizing. As long as you remember these, you can pretty much find your way to everything else.
Let’s take a look at all of the non-altered notes (all of the “white-key notes”) encompassed by the lines of the grand staff.
Notice that we have notes on both lines and spaces, so don’t forget to count the spaces when you’re counting to another note.
You can see that our landmark notes are highlighted, and, once you memorize their locations, you have a couple of different ways you could go about memorizing the other notes.
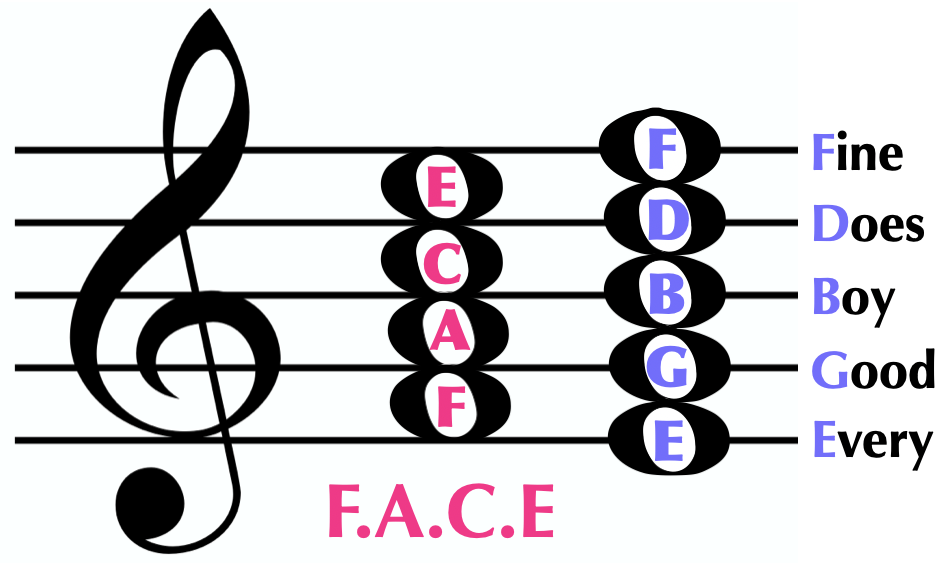
Some people like to use memory aids called “mnemonics,” which are little sayings or phrases that correspond to the different notes on the lines or spaces. For example, in the treble clef, the word FACE corresponds with the notes in the spaces, while the first letters in the words for the phrase “Every Good Boy Does Fine” correspond to the notes on the lines:
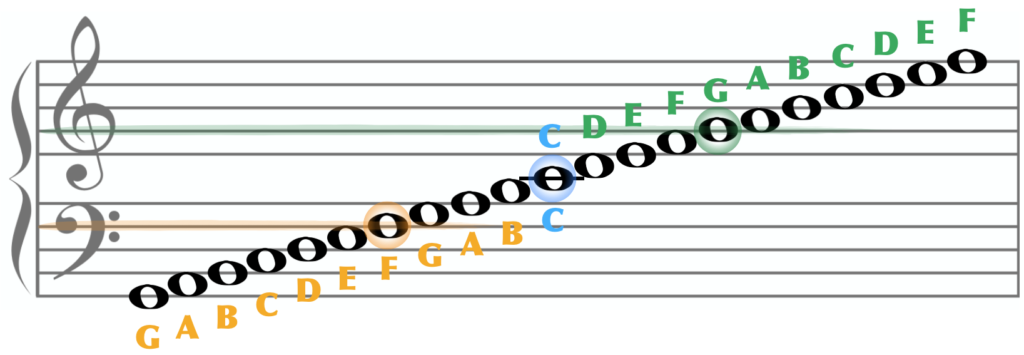
Another strategy is to look for commonly used notes that are associated with our landmark notes, and also to memorize a few select notes based on the look of the staves:
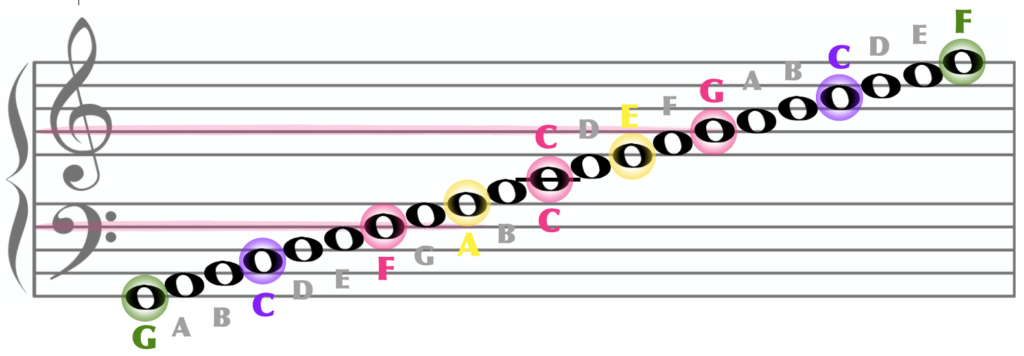
In the colorful example above, you can see some highlighted landmark notes that are worth memorizing in addition to the G and F given to us by the clefs. The notes A and E, below and above middle C, are the top and bottom notes of the two staves respectively, making them especially memorable visually. The C’s above and below middle C are very often used when playing the many early pieces that use the C major scale, and are also helpful to memorize. Finally, the high F and low G are worth remembering simply because they’re visually on the highest and lowest parts of the visible grand staff.
Whichever way you decide to memorize the locations of the notes, the most important thing by far is that you try to read as much music as possible. You can use as many little tricks and tips for memorizing as you want, but nothing beats looking at a lot of music to truly internalize where things are.
Now, if you want just the bare-bones basics of reading music notation, you could stop here. You know what note values are and how to place them onto a beat grid, and you have the tools to find different notes up and down the staff using the clefs. You have the horizontal and the vertical, and that’s the vast majority of what reading music is all about.
You now have the tools to read something like this:

Here is a review of the major terms we covered in How to Read Music - Part 1:
Part 1: Section 1 - Beats, Note Values, and Tempo
- Beat: the regular pulse underlying most music.
- Note values: the lengths of the notes with relation to each other.
- Tempo: the speed of the music.
- Five kinds of notes (based on a quarter note beat):
- Whole note = four beats
- Half note = two beats
- Dotted half note = three beats
- Quarter note = one beat
- Eighth note = half a beat
- Time Signature: numbers at the beginning of a piece we use to track beats.
- Measure: section of the staff based on the beats indicated by the time signature.
Part 1: Section 2 - Notes on the Staff
- Staff: the lines on which we place music notes for reading
- Barlines:
- Normal (single line): separates measures in the piece.
- Double (two lines, one thicker): signals the end of a piece.
- Repeat sign (double barline with two dots): repeat the previous section.
- Pitch: the tone being referred to by a note (the sound itself).
- Grand Staff: Commonly used double-staff, usually for piano.
- Clef: a symbol used to indicate notes location on the staff.
- Landmark Note: specific notes that we used to help guide us to other notes.
- Middle C: the note that falls directly in between the treble and bass staves.
- Treble Clef (G Clef): tells us the location of treble G (above middle C).
- Bass Clef (F Clef): tells us the location of bass F (below middle C)
BUT, even simple music usually incorporates a few extra features that are worth adding to your basic understanding. There really aren’t too many, so stick around for How to Read Music - Part 2!
And if you enjoyed what you learned so far, be sure to check us out at libertyparkmusic.com!
Sign up for our free newsletter
Useful articles for musicians
About the Author: West Troiano

West has over 10 years of teaching experience in settings that vary from private studios to college classrooms. In addition to teaching through traditional forms of piano pedagogy, West frequently produces music and teaching materials that cater to the needs of his students. Check out West's course on Piano Etudes for both beginners and intermediate pianists.


Thanks!
Informative and Helpful