![No Need to Give Up! Special Tips for Small-Handed Pianists [Part I] | Liberty Park Music tips for small handed pianist](https://www.libertyparkmusic.com/wp-content/uploads/No-Need-to-Give-Up-Special-Tips-for-Small-Handed-Pianists-Part-I-Liberty-Park-Music.png)
“How can you play the piano with such tiny hands?!”
I have been asked this many times in my life. Yes, I do have small hands; my maximum reach is just an octave. It’s not even a comfortable reach - I barely reach one octave. After years and years of trying different methods and techniques to reach more notes comfortably, I have come to the conclusion - I have to adjust the techniques according to my hand size. I have to find what works for ME, not simply following what is “believed” to be a good technique.
The more challenging repertoire you play, the more big chords you will encounter - more octaves, more jumps. It seems that those pieces simply require larger hands! You are lucky if you have big hands to reach all the notes without any problem, but not all of us have the luxury… But don’t worry, my fellow small-handed pianists! You don’t need to say you can’t play this or that, it might be just a matter of your technique and understanding of your body!
Small-handed pianists need to become extra aware of their physical needs, as they have a higher risk of experiencing pain or having playing-related injuries. They often have to stretch the hand for a long period of time without having the support of the bridge of the hand. It might be a slight discomfort in the wrist or arm at first, but if they do not take care promptly, it can lead to serious injury, such as tendonitis and carpal tunnel syndrome. The pain can be experienced not only during the practice session, but it can also happen when you are not playing. We must learn what works the best for our body and hand size. In other words, we must be able to notice the subtle discomfort of what we are doing.
If you haven’t done so already, please check out my previous article, How to Gain Body Awareness for Pianists, to first become atuned to your physical sensations. It introduces you some of the basic body movements such as standing up and sitting down at the piano, which helps you to be aware of your body. These exercises should be practiced regularly as a fundamental part of piano playing.
As the first of two articles that introduce useful tips for small-handed pianists, here I will share the tips how to make physical adjustment in order to execute octaves, chords, and large intervals easily. The second article on this topic will focus on making adjustments to the music in order to accommodate your body needs without losing the musical character.
Physical Adjustment for Octave and Chord Playing
The most common struggle that small-handed pianists experience is playing octaves and big chords. Before you frantically practice them over and over, let’s slow it down and check in with your body and what you are doing.
Finding a Correct Hand Position / Angle
Step 1: Put your hand to play any octave. Where are your fingertips?
The photo below shows the natural hand position. The arm is behind the middle finger and looks nice and straight. However, it doesn’t work for octave playing because the pinky is positioned too much in the middle of the key. It will require more effort for the pinky in this hand position.

Step 2: Tilt your hand from the wrist as if you are waving at a friend. Tilt only slightly to the right until the fingertip of the thumb and pinky align at the same horizontal line.

Step 3: Pull your elbow towards you so that the fingertips rest at the edge of the keys.

Step 4: Now play the octave slowly, but play as close as possible to where the inner keys are.

Step 5: Squeeze the thumb and pinky inwards. Hooray! Look at the nice curved hand shape!
We have the hand bridge again, the solid support from the knuckle relaxes the finger, which allows them to move faster and easier! Be aware that you are more likely to use the side of the fingertips. It is necessary for us small-handed pianists to do so in order to avoid the unnecessary tension.

Once you are comfortable with the new hand position, try playing a chromatic ascending scale slowly. Feel each key and make sure your hand is supported by the hand bridge. So many traditional technique books recommend using the fourth finger (4-1 / 1-4) for the black key octaves. Yes, it is useful to create legato lines if you can connect the top notes by alternating the fourth and fifth fingers, however, I would never recommend this technique for small-handed pianists. Even only with the fifth finger (5-1 / 1-5), you can play fast octaves or melodic legato lines. It is simply a matter of how carefully you listen to the sound (voicing), how well you can “phrase” the melody by adding a subtle crescendo or decrescendo, and the use of the pedal. If you can do all these, you will have no problem using just the fifth finger.
In the video below, I demonstrate how to use this technique to play octaves in succession at ease.
Voicing - Less Thumb!
Now let’s work on “voicing.” Voicing is an important concept in piano playing. There are so many notes in piano music, but some notes are more important than the others. When you bring out those important notes in a chord or octave, you are “voicing” them well. How does this concept help the pianists with small hands? Here is how: traditionally, unless notated otherwise, the outer voices - the bass and the top note - are more important. This means, you do not need to play everything at the same dynamic. Our thumb, which is a major tension holder, can actually relax quite a bit when playing chords or octaves.
Instead of focusing on making the pinky louder, here is the secret to make the voicing easier AND automatically reduce the tension: change the ANGLE of the hand! Simply twist the hand as if you are twisting a doorknob, slightly to the right (when it’s right hand of course), then you can easily focus your weight on the pinky side of your hand, which helps to relax your thumb.

These two techniques are very useful when you are learning repertoire that contains a lot of chords and octaves.
If you are not sure that you are doing it right, watch the video below to get a better understanding and practice tips for voicing. Also, this video will show you how to “follow-through” with your arm after playing a chord in order to release the muscle tension. This will help you to have nice round sound with less tension.
Use of correct hand mechanism - Open & Close
As I mentioned above, small-handed pianists tend to over stretch their hands for a long period of time. Many beginner and intermediate students seem to have tense hands. It probably comes from the fear of losing track of the fingerings or notes. But the more you are afraid, the more tense you will become.
Shown in the photos below, our hands have the ability to open and close. It’s the same mechanism as the traditional Asian fan. If we could close the hand when we don’t use it, that would save us so much energy and we can avoid unnecessary tension. However, in order to do so, we all need to know when and how.


This technique is also very useful to be used with the concept of shifting the angle of the hand. The video below introduces when and how to use this open-close mechanism with the idea of shifting the hand angle is also explained. Most likely you can use this mechanism whenever you see: (1) repetitive patterns (i.e. Alberti bass, waltz bass, arpeggio), (2) large leaps, and (3) fast rolls.
Use of correct hand mechanism - Hand “Door Knob” Rotation

Another mechanism that pianists tend to forget is rotation. We “twist” the doorknob to open the door. We can use this mechanism very effectively in the piano playing. For any passages that use the thumb or pinky as the pivot, such as octave tremolos and repetitive broken chords, this technique will be useful to play difficult phrases with less tension in the wrist.
The video below explains and demonstrates the rotation technique. Once you master this technique, you will notice that playing the piano feels much easier. In fact, you can use the subtle version of this technique to pretty much everything that you are working on.
In case you are still not familiar with basic technical exercises that help you to make the best use out of your arm weight and allow your wrist to be flexible, check out my videos for Arm Weight & Flexible Wrist.
Pain-Free Practice Tips
Tip 1: Play, then Close Hands (Make a fist)
When tackling challenging phrases that have a lot of big chords or octaves in succession, play, then close your hands is a useful practice method. This is very simple. Play as slow as you like, or as fast as you like, but always close your hands, after once or twice of repeating the same phrase. This action loosens the tensed muscles and it resets the unnecessary muscle tension. When you are practicing, you are engraving in your muscle a kinesthetic memory. When the muscle remembers the tension, it becomes dangerous, because your muscle will tense up automatically whenever you play the same phrase. This method is useful, especially if you would like to work on the same section for a long time.
Tip 2: Video Record Yourself or Practice in Front of a Mirror
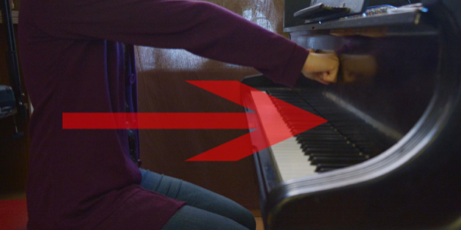
When you are learning music, you are so focused on the music that you might not pay much attention to your posture and gestures. However, the more you pay attention to your physical needs, you will be more likely to be productive in practice sessions. For the best results, video record yourself. The camera should capture your whole upper body from a side angle. Watch out for:
(1) High Wrist Position: small-handed pianists tend to play octaves with high wrist. This is a common habit and you will need to consciously fix this habit, otherwise, your arm will start to have pain.
(2) Shoulder Tension: If you notice that your shoulders are tensed up, think of a long neck. Think to yourself, Head Up, Neck Long, Shoulders Down. Just thinking about the arrows going up and down onto your head and shoulders helps to reduce the shoulder tension.
(3) Stiff or No Movement of the Wrist or Arm: When all the joints are moving effectively, shoulders, elbows and wrists should look completely free. Nothing is locked into one position. The arm should always follow behind the finger that you are currently playing with. Are you following through the gesture? Are you releasing the muscle after you play the chords?
Tip 4: Mindful Repetition
Small-handed pianists have to be smart when it comes to practicing. We cannot afford to just play octaves all the time! Before working on the challenging sections, ask these question: Do I know the notes? Do I know the harmony? Do I know the dynamics? Do I have the musical ideas? If you don’t know the answers to these questions, then, try these methods: play the top line (melody line) only to figure out what works the best musically. Play the melody and the bass line to hear the counterpoint. Or play the chords with two hands to have the sound in your head. Once you really have the right idea and appropriate sound in your head, then you can start working on it slowly. The more you spend time studying the music away from the piano, the quicker you will get to the final result and you can minimize the time you have to stretch the hands!
Bonus Tip: Invest in a piano with ⅞ inch or 15/16 inch keys
Have you ever imagined what it would be like if pianos existed in different sizes like the violin does? Well, they actually exist! Unfortunately this would be the ultimate and most expensive choice for small-handed pianists. Additionally, they are also sold as an installable keyboard that you can order and install on your home piano. Companies, such as Steinbuhler & Company (USA), the Walter (USA), Cunningham Piano of Philadelphia (USA), Laukhuff (Germany), Kluge (Germany), and Pinkham Pianos (UK), make these narrower size keyboards. I have attended a conference in the past where the speaker introduced one of those narrower keyed pianos, and a few students performed on it and the regular piano back to back. The result was obvious - much less tension, secure octave and chord execution, and a much rounder tone production. Of course this choice is not for everyone, but it is nice to know there is a piano that perfectly matches your hand size and you do not have to give up playing certain repertoire just because you cannot reach!
To Be Continued
All of these techniques seem such a subtle change, but these small changes make a big difference! The better understanding you have about your own body and hand mechanisms, the more you will be able to enjoy your endeavours with the piano. Are your hands too small to play the piano? NOT AT ALL! Once you find what works for YOU, you can play anything you like! So, keep up the good work!
Stay tuned for the next article where I will share more tips for you to enjoy the piano regardless of your hand size!


thanks for the information
Thank you! I have been struggling with my octaves, could not manage the 1-4 moving to 1-5 fingering suggestion on the pieces I am practicing. Especially delighted to know that I can buy a keyboard/piano with smaller keys!