

Throughout our lives as musicians, we learn from our mistakes, whether they be small simple errors when playing a certain piece, or a more deep routed weakness in a fundamental skill such as pulse or counting.
The best musicians are the ones who are able to learn from their own mistakes.
However, there are certain common mistakes which are easy to avoid, yet still seem to trip up most beginner drummers.
This article will outline some of these common mistakes, many of which I commited personally as a beginner, and look at how they can be avoided, and why doing so will benefit your playing in the long run.
By taking note of these potential obstacles now, you will save yourself a lot of strife in the future!
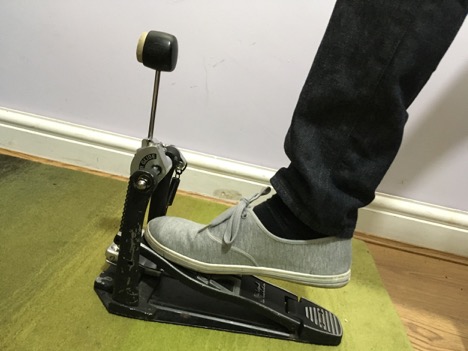
1. Stamping on the Bass Drum Pedal
This is a classic mistake made by most young students when they start incorporating the bass drum into their grooves. The control required to operate a bass drum pedal is unlike any movement that we commonly make outside of drumming, and the most natural movement most beginners find is to take their entire foot off the pedal by about 20 centimetres before smashing it down on the pedal with an unnecessary amount of force--producing a harsh, dead thump.
This is an example of bad technique for many reasons. Firstly, and as I’ve already mentioned, the sound that is produced will be harsh and dead, which might be appropriate for a certain musical situation, but most of the time won’t be. Secondly, by using such force and exerting such energy for a prolonged period of time, you will greatly increase your chances of developing RSI (repetitive strain injury) or another type of muscle strain. Thirdly, the time it takes to lift your foot off the pedal and bring the whole thing back down again means that any quick bass drum passages simply won’t be possible. Remember, the further your foot/hand/stick has to travel, the longer it’s going to take, which results in slower speeds.
This mistake, however, is an easy one to fix. Ensure that some part of your foot is in contact with the bass drum pedal at all times. There are 2 main techniques for doing this and each comes with it’s own benefits and hindrances.
Heel down

The heel down technique will generally produce a quieter sound but will permit greater control and intricacy at lower volumes. This technique is also beneficial if you, like myself, want to produce a more open, ringing bass drum sound by letting the bass drum beater strike the drum and immediately return to its starting position, around 3-5 cm from the drum head.
Heel up
The heel up technique is more suited to louder musical styles such as rock, or larger venues where the bass drum needs to carry further. This technique requires a greater movement from the leg, which exerts more energy and is preferential if you want to deaden the bass drum by allowing the beater to rest on the head after striking.
2. Neglecting the non-dominant foot
Most beginner drummers, particularly those with an interest in rock or pop music, follow a similar pathway to developing 4-way coordination between both hands and both feet. That pathway usually goes something like this:
- Start with dominant hand
- Add non-dominant hand
- Add dominant foot
- Add non-dominant foot
However, in most cases, and speaking from own experiences as a beginner 15-20 years ago, while the first 3 steps begin fairly early on in our development, the 4th step (adding the non-dominant foot) is often neglected until a much later stage. The first drum groove which most people learn incorporates the hi-hat and snare drum in the dominant and non-dominant hands respectively, and the bass drum in the dominant foot.

After learning this basic quarter note groove, most of us learn variations on it, before adding 8th notes and 16th notes in the hi-hat, snare, and bass drum as well as playing triplet-based rhythms such as the shuffle. We get to an intermediate level but can still only really play patterns that utilise 3-way coordination. I say “really” because of course we have been learning how to play some open hi-hats, which makes use of the left foot for brief moments, but by neglecting the non-dominant foot in this way, we are missing out on a quarter of our bodies’ capacity to play the drums.
Like most of these mistakes, this is a very simple one to fix. Start using the non-dominant foot as early as possible. Begin by playing simple rhythms just on the hi-hat pedal without worrying about coordinating the other 3 limbs. This will get you used to the pedal action. Then start adding simple repetitive rhythms in the left foot while playing any other grooves you know how to play. For example, you could take the basic quarter note groove outlined above, but add left foot quarter notes in unison with the right hand, which you could move to the ride cymbal. This is a relatively difficult groove for beginners to master, but taking the time early on will pay dividends with more challenging left foot work in the future.
3. Practicing without a metronome
There is a common misconception that having a steady pulse and solid sense of time is something that’s innate and can’t be taught. This is of course absolutely not true, and while some people do have a more natural sense of pulse than others, time is something that everybody should devote a large portion of time to practicing, no matter how natural a player they might be.
As a beginner, I rarely used a metronome. I often played along to music, but much of it was recorded without a click and featured changes in tempo. I had this naive belief (probably the result of too much undue praise) that I was a “natural” and that my time didn’t require more practice. How wrong I was!
When I got to a higher level and started playing with better musicians at college and university, I began to realise that there was a discrepancy between my pulse and theirs. This was most obvious coming out of drum fills or in songs that featured a stop on beat one, followed by a strong entry on beat one of the following bar. I found that I always came in earlier than everyone else and rushed the fill, or the count. I had to spend years unlearning a lot of bad habits related to time and pulse and I believe that had I got used to practicing with a metronome from an early age, this wouldn’t have been such an issue for me.
Of course the way to solve this problem is obvious, devote a portion of every practice session to playing with a metronome. However, while playing with a metronome early on will help you to play in time, it’s also important to remember what a metronome actually is and what it’s designed to do. The common conception is that a metronome is an aid to keeping musicians in time, but I believe that viewing it from this angle is very limiting. A more helpful perspective is to see the metronome as a tool that helps musicians to improve their own time.
By practicing along to a metronome we become dependent on it to play with a steady pulse, but when we’re more creative we can use it to help improve our own internal pulse. Here are 2 such methods:
- Metronome reduction - Reduce the tempo of your metronome so you’re not hearing a click every beat. For example if you’re playing at 80bpm, set your metronome to 40bpm, so you’re hearing a click on beats 1 and 3. Then half this again to 20bpm, so you’re only hearing a click on beat 1 of each bar. Now the metronome is playing so infrequently it is no longer keeping you in time, but merely telling you at longer intervals whether or not you’re keeping a steady pulse.
Metronome displacement - Once you’ve reduced the metronome, try displacing the click. If we take the previous example of metronome reduction and you’re playing at 80bpm with the click at 20bpm (one click every 4 beats) try and think of this click as beat 2 of each bar rather than beat 1. You can displace to any beat you like, and any subdivision of that beat and by doing so you’re training yourself to be less dependent on hearing a heavy accent on beat 1. When we play in a band we need to be able to keep a steady pulse without being distracted by other musicians playing on other subdivisions of the beat, and this exercise certainly helps with this.
Learn with LPM
4. Tight stick grip
When playing the drums, our sticks should move freely and in a natural arc around a fulcrum that’s usually between the thumb and index finger, or in my case, the thumb and middle finger. A lot of beginner drummers grab the drum stick tightly in the palm of the hand which results in very little movement from the stick. This lack of movement means that the wrist, forearm, and upper arm have to move more while playing, which first and foremost is an unnecessary waste of energy, but also produces a forced, choked sound from the drums, as it often means that the stick doesn’t rebound naturally from the drumhead.
There isn’t one single solution to this problem, just as there isn’t a single “correct” technique. Every drummer has a slightly different technique, and if your technique accommodates the sound that you want without causing excessive muscle strain, then in my opinion, it doesn’t need to be changed.
I believe that it’s more important to consider what not to do when it comes to drum stick grip, as there are certain things that will hinder your ability to play a certain way (at faster tempos, or at a specific volume for example). Here are a few things you should consider if you notice you’re guilty of gripping the sticks tightly:
- Allow the sticks to rebound freely from the drum.
- You should be able to strike the drum without any movement from the arm. Try generating your stick action with your wrist, fingers, and most importantly--with the stick itself. Allow the stick to travel in a natural arc.
- Practice at different dynamics (volumes) and check whether your grip is hindering your ability to produce a large contrast between loud and soft. As drummers we have a massive dynamic range, more so than any other musicians, so make sure that your grip isn’t hindering your ability to unlock your instruments’ dynamic potential.
5. Striking the Drum at the Edge
This is a really simple one that makes a huge difference to the sound clarity of each drum. Striking the drum at the edge creates a thinner more whispy sound than striking in the centre. While this might be appropriate for certain musical settings, when playing a steady rock and pop groove it certainly isn’t, so it’s important to get into the habit of striking each drum centrally.
Again, this is a simple mistake to fix and is usually either the result of the drum kit being set up in such a way that striking the drum centrally is difficult, or a lack of awareness to the sound produced by the drum. Many of my students start striking the snare drum towards the far edge because the drum stool is too close to the drum kit. Position yourself in such a way that you can hold the sticks comfortably by your sides and strike the snare drum and low tom centrally. When moving around the toms, remember how each drum should sound when hit in the centre of the head.
Final Thoughts
I hope these tips help you to improve your drum sound and technique, but remember that the most important thing with all of the above examples is using your ears. The ability to listen is the most important skill any musician can learn, after all, music is an auditory art form! You can have the best technique in the world and be able to play incredibly difficult passages of music, but your ears give you the best indication if the finer details of your playing aren’t quite right.
About the Author: Brendan Bache

Brendan has been in love with the drum kit since the age of 8. His love for music spans many musical genres but his great passion is the study and performance Latin American music. This interest has led Brendan to study many Latin percussion instruments such as congas and bongos as well applying these rhythms to the drum kit. Brendan is the drum kit teacher at Liberty Park Music. Check out his drum kit courses!


