

The day you receive your first instrument is one of the most exciting moments many musicians experience.
I received my first drum kit, an old red Hohner Percussion (taken over by Sonor Drums), for my 8th birthday, and having spent my early years listening to the rock bands that my parents introduced me to, I was in awe of this amazing instrument. I wanted to be just like Roger Taylor from Queen or Nico McBrain from Iron Maiden and this instrument would allow me--at least in my 8 year old brain--to fulfill that dream.
I knew nothing about how to play the drums, but I wanted nothing more than to sit down and start hammering away at them. While other musicians such as pianists or guitarists get their instruments, tune them (if appropriate) and start playing, the varied nature of the drum kit means that our set up is far more complex and time-consuming; after all, our instrument is a collection of many different instruments.
Before I could start playing, my parents had to attempt (with no prior experience or knowledge) the difficult task of setting up my drum kit. They did a great job and I was able to go ahead and start smashing away contentedly. However over time, as I grew I had to adjust certain things about the way my drum kit was set up: the height of the stool, angle of the snare drum, distance between cymbals, etc. There is also no correct way to set up a drum kit as it’s dependent on so many variables such as your height, weight, reach, and personal preference.
This article, along with the accompanying videos, will help you to streamline the process of setting up your first drum kit and take away a lot of the trial and error that I, and most other drummers had to endure in the search for the optimal setup.
This process will take us through all the main components of the drum kit:
- Stool setup
- Snare drum setup
- Bass drum setup
- Hi-hat setup
- Tom Tom setup
- Floor tom setup
- Ride/crash cymbal setup
Stool Height
The first, and perhaps most important, consideration while setting up your drum kit is the height of your stool.
You need to be able to operate the pedals comfortably:
- If your stool height is too low, your shins will begin to ache.
- If your stool is too high, you’ll be stamping down on the pedals and your technique will suffer.
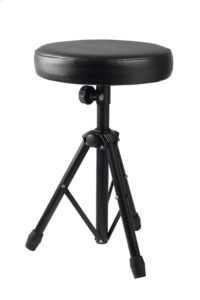
The height of your stool will also determine the height of the snare drum, tom toms, floor tom, hi-hats, crash cymbal, and ride cymbal, so it’s imperative that you prioritise this.
You should aim to have your quadriceps approximately parallel with the floor, but try setting your stool to various heights and playing the pedals. If you notice that your legs start to ache, then it’s likely that you’re either too high or too low.
Snare Drum

The next thing you need to consider is your snare drum height and angle.
The snare drum is placed between your legs and should be at such a height that you’re able to hit the drum head in the centre, while also being able to strike the rim of the drum.
The snare is one of the most versatile drums on the drum kit, so it’s important that you’re not restricted to only hitting one specific spot.
Next you need to consider at which angle you’d like the snare drum to sit.
There is no correct way of tilting your snare.
- Some drummers (myself included) like their snare flat, others like Nico McBrain from Iron Maiden like it tilted towards them, while others, usually who play with traditional grip such as Buddy Rich, like it tilted away from them.
- If you are short, and have a drum kit with a very large bass drum, you might want to tilt the snare towards you to decrease the distance between the snare drum and the high tom.
Bass Drum

The next logical step in setting up your drum kit is the bass drum placement.
The bass drum is operated by using a pedal with your dominant foot (right foot if you’re right footed, left foot if you’re left footed).
The bass drum isn’t adjustable in itself, but the distance you sit from it is crucial.
- If you’re too close, your shins will start to ache and if you’re too far you’ll be craning to reach the rest of the kit.
- Make sure your bass drum pedal is securely clamped on the bass drum hoop (or riser if appropriate), and check that the bass drum hoop has some sort of protection from the pedal clamp.
- The bass drum hoop can quickly get damaged if you don’t take precautions here.
Bass Pedal
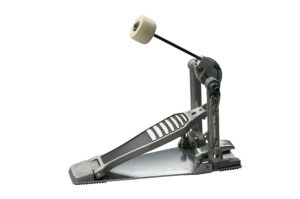
Ensure your bass drum pedal is set to a comfortable tension. This is done by adjusting the tightness of the spring usually located on the right hand side of the pedal.
If you notice the pedal is too springy and is difficult to press down then loosen the spring; if it’s too “soft” and easy to press you might want to tighten it slightly. This is all down to personal preference and there is no right or wrong way of setting up your bass drum pedal.
Hi-Hat
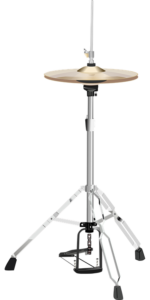
The hi-hat is the final “essential” piece of kit that we need to set up.
With the bass, snare, and hi-hat you can already play tons of material, particularly when playing rock or pop music. The hi-hat is usually placed to the left of your snare drum for right handed players, or to the right for left handed players.
The hi-hat can be played in many ways, one of which is by using the foot pedal. When setting up the hi-hat stand, follow a similar procedure to the one you followed in setting up the bass drum; ensure the stand is an appropriate distance away from you.
One of the most important aspects to setting up your hi-hat is ensuring the height is comfortable.
When you’re playing drums your strong hand usually plays the hi-hat while your weak hand plays the snare, meaning that your hands will be crossing over with your right hand (or at least the stick in your right hand) going over your left stick.
If your hi-hat is set too low, you’ll find that your right hand stick will obstruct your left stick when playing the snare drum. Setting the hi-hat too high will mean that you’re unable to strike the cymbals on the top, and will be constantly hitting the edge of the cymbals, creating a harsher, more sloshy tone. Set the hi-hats to the height at which you can hit both the edge and top of the cymbals comfortably, without restricting the access of your left hand to the snare drum.
Cymbal Spacing
The hi-hats are two cymbals that can either be played “closed” (both cymbals clamped together using the foot pedal) or “open” (the top cymbal raised so it crashes against the bottom cymbal producing a sloshy sound).
It’s important that you set the hi-hat clutch (the device that holds the top hi-hat in place) so it’s an appropriate distance above the bottom hi-hat.
If your cymbals are too tight when the left foot is in the “open” position, you will be unable to produce an open hi-hat sound.
If your cymbals are too open when in the “open” position, they won’t crash against each other and you’ll actually just be hearing the sound of the top hi-hat in isolation.
Tom Toms
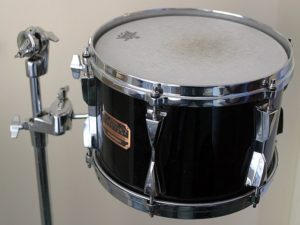
The hi and mid tom toms are usually mounted over the bass drum using a tom arm. Check whether your bass drum is drilled and that a tom mounting unit is installed. If so read on, otherwise skip to the “undrilled bass drums” section below. Here is the procedure you should follow when setting up your tom toms:
- Start by placing your tom arm in the mounting bracket located on top of your bass drum. Tighten the wingnut so the arm is secure.
- Place your tom toms on the mounting arms and secure the wingnut located on the tom tom mounting system (on the drum itself). Make sure that the smaller of the two toms (the hi tom) is placed above the snare drum, with the mid tom sitting alongside it.
- Adjust the tom toms to a suitable height by making necessary adjustments to the bass drum tom mounting bracket/tom arm.
- Tilt the toms towards you so you’re able to strike them both in the centre of the drum head, but also on the rim as you might need in certain playing situations.
Undrilled Bass Drums
If your bass drum is undrilled, you’ll need to find an alternative method of mounting tom toms. This is usually done by mounting them on a nearby cymbal stand using a clamp, but can also be done by using a snare drum stand, though this method only really works if your drum kit only has one mounted tom tom.
Floor Tom (Low Tom)
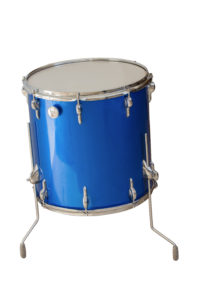
The floor tom, as the name would suggest, is a free standing drum and it sits below the mid tom. The floor tom is usually mounted with three legs that fit into the leg brackets located around the drum.
A common mistake that many people make when setting up the floor tom is putting the floor tom legs the wrong way through the leg brackets.
The brackets are located towards the bottom of the drum, not the top, and if you put the legs in the wrong way, you’ll find that the brackets are at the top of the drum and you’re restricted as to how high you can mount the floor tom. By adjusting the height of each individual floor tom leg you can make the drum tilt slightly towards you, or if you prefer, you can leave it flat.
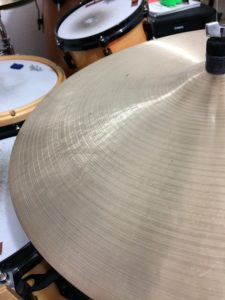
Ride and Crash Cymbals
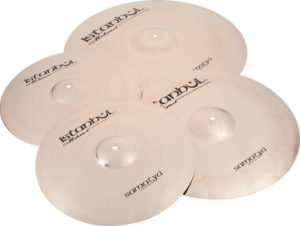
The ride cymbal is usually placed so it’s hanging over the floor tom or mid tom, while the crash cymbal is commonly placed above the hi-hats (overhanging the hi tom).
The most important consideration to make when setting these cymbals up is how each one is likely to be played.
The ride cymbal is played in a similar way to the hi-hats, while the crash is used as an accent to add emphasis to certain moments of a phrase. This means that the ride is usually going to be struck on top of the cymbal, with the tip of the stick, while the crash is more commonly struck on the edge, with the neck of the stick. To accommodate this, the ride cymbal will either need to be set to a low height, or have a sharp tilt towards you. On the other hand the crash will need to be set slightly higher, or with a flatter angle to allow the edge of the cymbal to be in reach.
Another important consideration is the distance the cymbals are from your drum kit. I often see students who have their drum kits set up in such a way that they’re unable to reach every component without stretching. Feel free to mount the cymbals so they overhang other parts of the drum kit, just make sure that it doesn’t obstruct the trajectory your stick will take on it’s way to striking the centre of a drum.
Hardware
Throughout this process there are some important points to remember relating to your hardware;
- Tighten wingnuts - If you loosen any wingnuts in a cymbal or drum stand, make sure you tighten them again. The last thing you want is a cymbal or snare that moves downwards every time you hit it. Don’t tighten screws and wingnuts too tight so that you won’t be able to, or will need a pair of pliers, to unscrew them again.
- Make sure bases are secure - If the base of your stand isn’t spread out far enough, the stand itself could fall over once the instrument it’s holding is struck. Be sure to widen your stand bases and tighten the wingnuts afterwards. Widening stand bases too far will take up an unnecessary amount of floor space, something which could cause problems if you’re playing a large drum kit, or intend to use mic stands to record your drums.
Conclusion
Remember that every drum brand is different; some use different tom mounting systems, whereas others have different drum depths.
While some manufacturers make drums and hardware that are more ergonomic and flexible than others, it should be possible to set your drum kit up in such a way that it is comfortable for you to play.
Finding your optimum setup will inevitably take some degree of trial and error, but I hope that this guide will give you a valuable head start.
The content in this article and the accompanying videos are part of the Rock and Pop Drum Kit Beginner Course, an online drumming course taught by Brendan at Liberty Park Music.
About the Author: Brendan Bache

Brendan has been in love with the drum kit since the age of 8. His love for music spans many musical genres but his great passion is the study and performance Latin American music. This interest has led Brendan to study many Latin percussion instruments such as congas and bongos as well applying these rhythms to the drum kit. Brendan is the drum kit teacher at Liberty Park Music. Check out his drum kit courses!
Hello,
I want to buy a Ronald drum. Is it ok?
I assume you mean a Roland kit. If you want an electric kit then Roland are a safe bet. I would always encourage learning on an acoustic kit whenever possible.
I’ve started taking drum lessons again after 2 years that I stopped but in the last year I’ve been practicing regularly. I’ve had 2 different tutors but recently I found one not far from where I live. I think it’s wise to rethink of taking drums more seriously. Thanks.
I’m delighted to hear that Grace! Playing a musical instrument can be an incredibly fulfilling experience and I’m glad you’ve caught the bug again!
Brendan
thanks for the information https://www.audiotent.com/
Great advice for me as a beginner
Thanks Alyson. I’m glad you found it useful!
Thank you for this very helpful and insightful information ..
I’m a beginner and am grateful for any help I can get along my drumming journey!
Warm regards
Kezza (Kerry) 🙂
That’s great to hear Kezza! Thanks for your feedback
Brendan
GREAT tutorial! I’m a 70 year old beginner. I’ve been a professional bass player since junior high school and always wanted to play drums.
Now I know how to set up my Tama drums!