

Many beginning guitar players struggle to perform smooth and seamless chord changes. Without smooth transitions between chords, your rhythm guitar playing will sound choppy and stuttered. Chord changing stutters also cause problems when playing with other musicians because they throw off the rhythmic pulse. If you’re playing rhythm guitar with another musician, say a vocalist for example, the inability to play with a consistent tempo will make it very difficult for the vocalist to get comfortable and put on a good performance. Having a reliable rhythm section provides comfort to the musicians taking on lead roles.
So for those of you who intend to play guitar with other musicians in gigs, or those of you who intend to sing while playing guitar, it is extremely vital that you get your chord changes as smooth and rhythmically correct as possible. In this article, we’ll check out some methods to develop good chord changing fundamental techniques and then provide some chord changing exercises to practice.
The Fundamentals
The methods to master the techniques of playing guitar are very similar to the methods used in other physical art forms. If you’re into sports, martial arts, visual arts, or any other kind of craft that require you to use well-coordinated body movements, these techniques and exercises will seem very familiar.
1. "Slow is smooth, smooth is fast"
Those of you with a military background will immediately recognize this phrase. I first heard it during my mandatory two years of military service in Singapore. The context I heard it in was during a training exercise that was taking place in an urban environment. Urban operations tend to be very risky due to the large number of high vantage points and structures that can be used for cover. However, just because the job is risky, doesn’t mean you can take your time completing the task: time is still limited.
So how did we get to the point of being able to clear zones in a swift and efficient manner? The secret lies in the phrase, “Slow is smooth, smooth is fast.” In order to develop muscle memory and quick reactions without thought, we were made to perform the same task many, many, MANY, times in a painfully slow and deliberate manner. Once we were confident at executing our tasks at a certain pace, the speed was increased again, and again, and again.
The same method of starting excruciatingly slow should be used when developing smooth chord changes. Forcing yourself to move slowly accomplishes a few things. First, it helps you avoid jerky movements, which are detrimental to quickly developing muscle memory; you always want to move in a smooth manner when developing a new muscle movement. Second, it allows you to observe your movement for any inefficiencies. Closely monitor your hands for inefficient movement, such as moving your fingers too far away from the fretboard while changing chords, and correct them as soon as they are discovered. Finally, moving slowly allows you to stay as relaxed as possible. Staying as relaxed as possible while learning new movements can help you pick them up a lot faster than trying to learn them while your body is tense.
Firstly, it helps you avoid jerky movements, which are detrimental to quickly developing muscle memory. You always want to move in a smooth manner when developing a new muscle movement.
Secondly, it allows you to observe your movement for any inefficiencies. Take this opportunity to observe any inefficient movement (eg. your fingers move too far away from the fretboard while changing chords) and correct them as soon as they are discovered.
Lastly, it allows you to stay as relaxed as possible. Staying as relaxed as possible while learning new movements can help you pick them up a lot faster than trying to learn them while your body is tense.
If any of you are into martial arts, think about the countless boxing montage videos out there of a boxer learning a new combination. It always begins with the boxer starting out slowly and effortlessly, before building intensity.
By forcing yourself to move slowly, you can accomplish:
- Smooth, jerk-free movements
- Tackle inefficiencies in your movements
- Continue playing in a calm & relaxed manner
2. Plan your chord changes
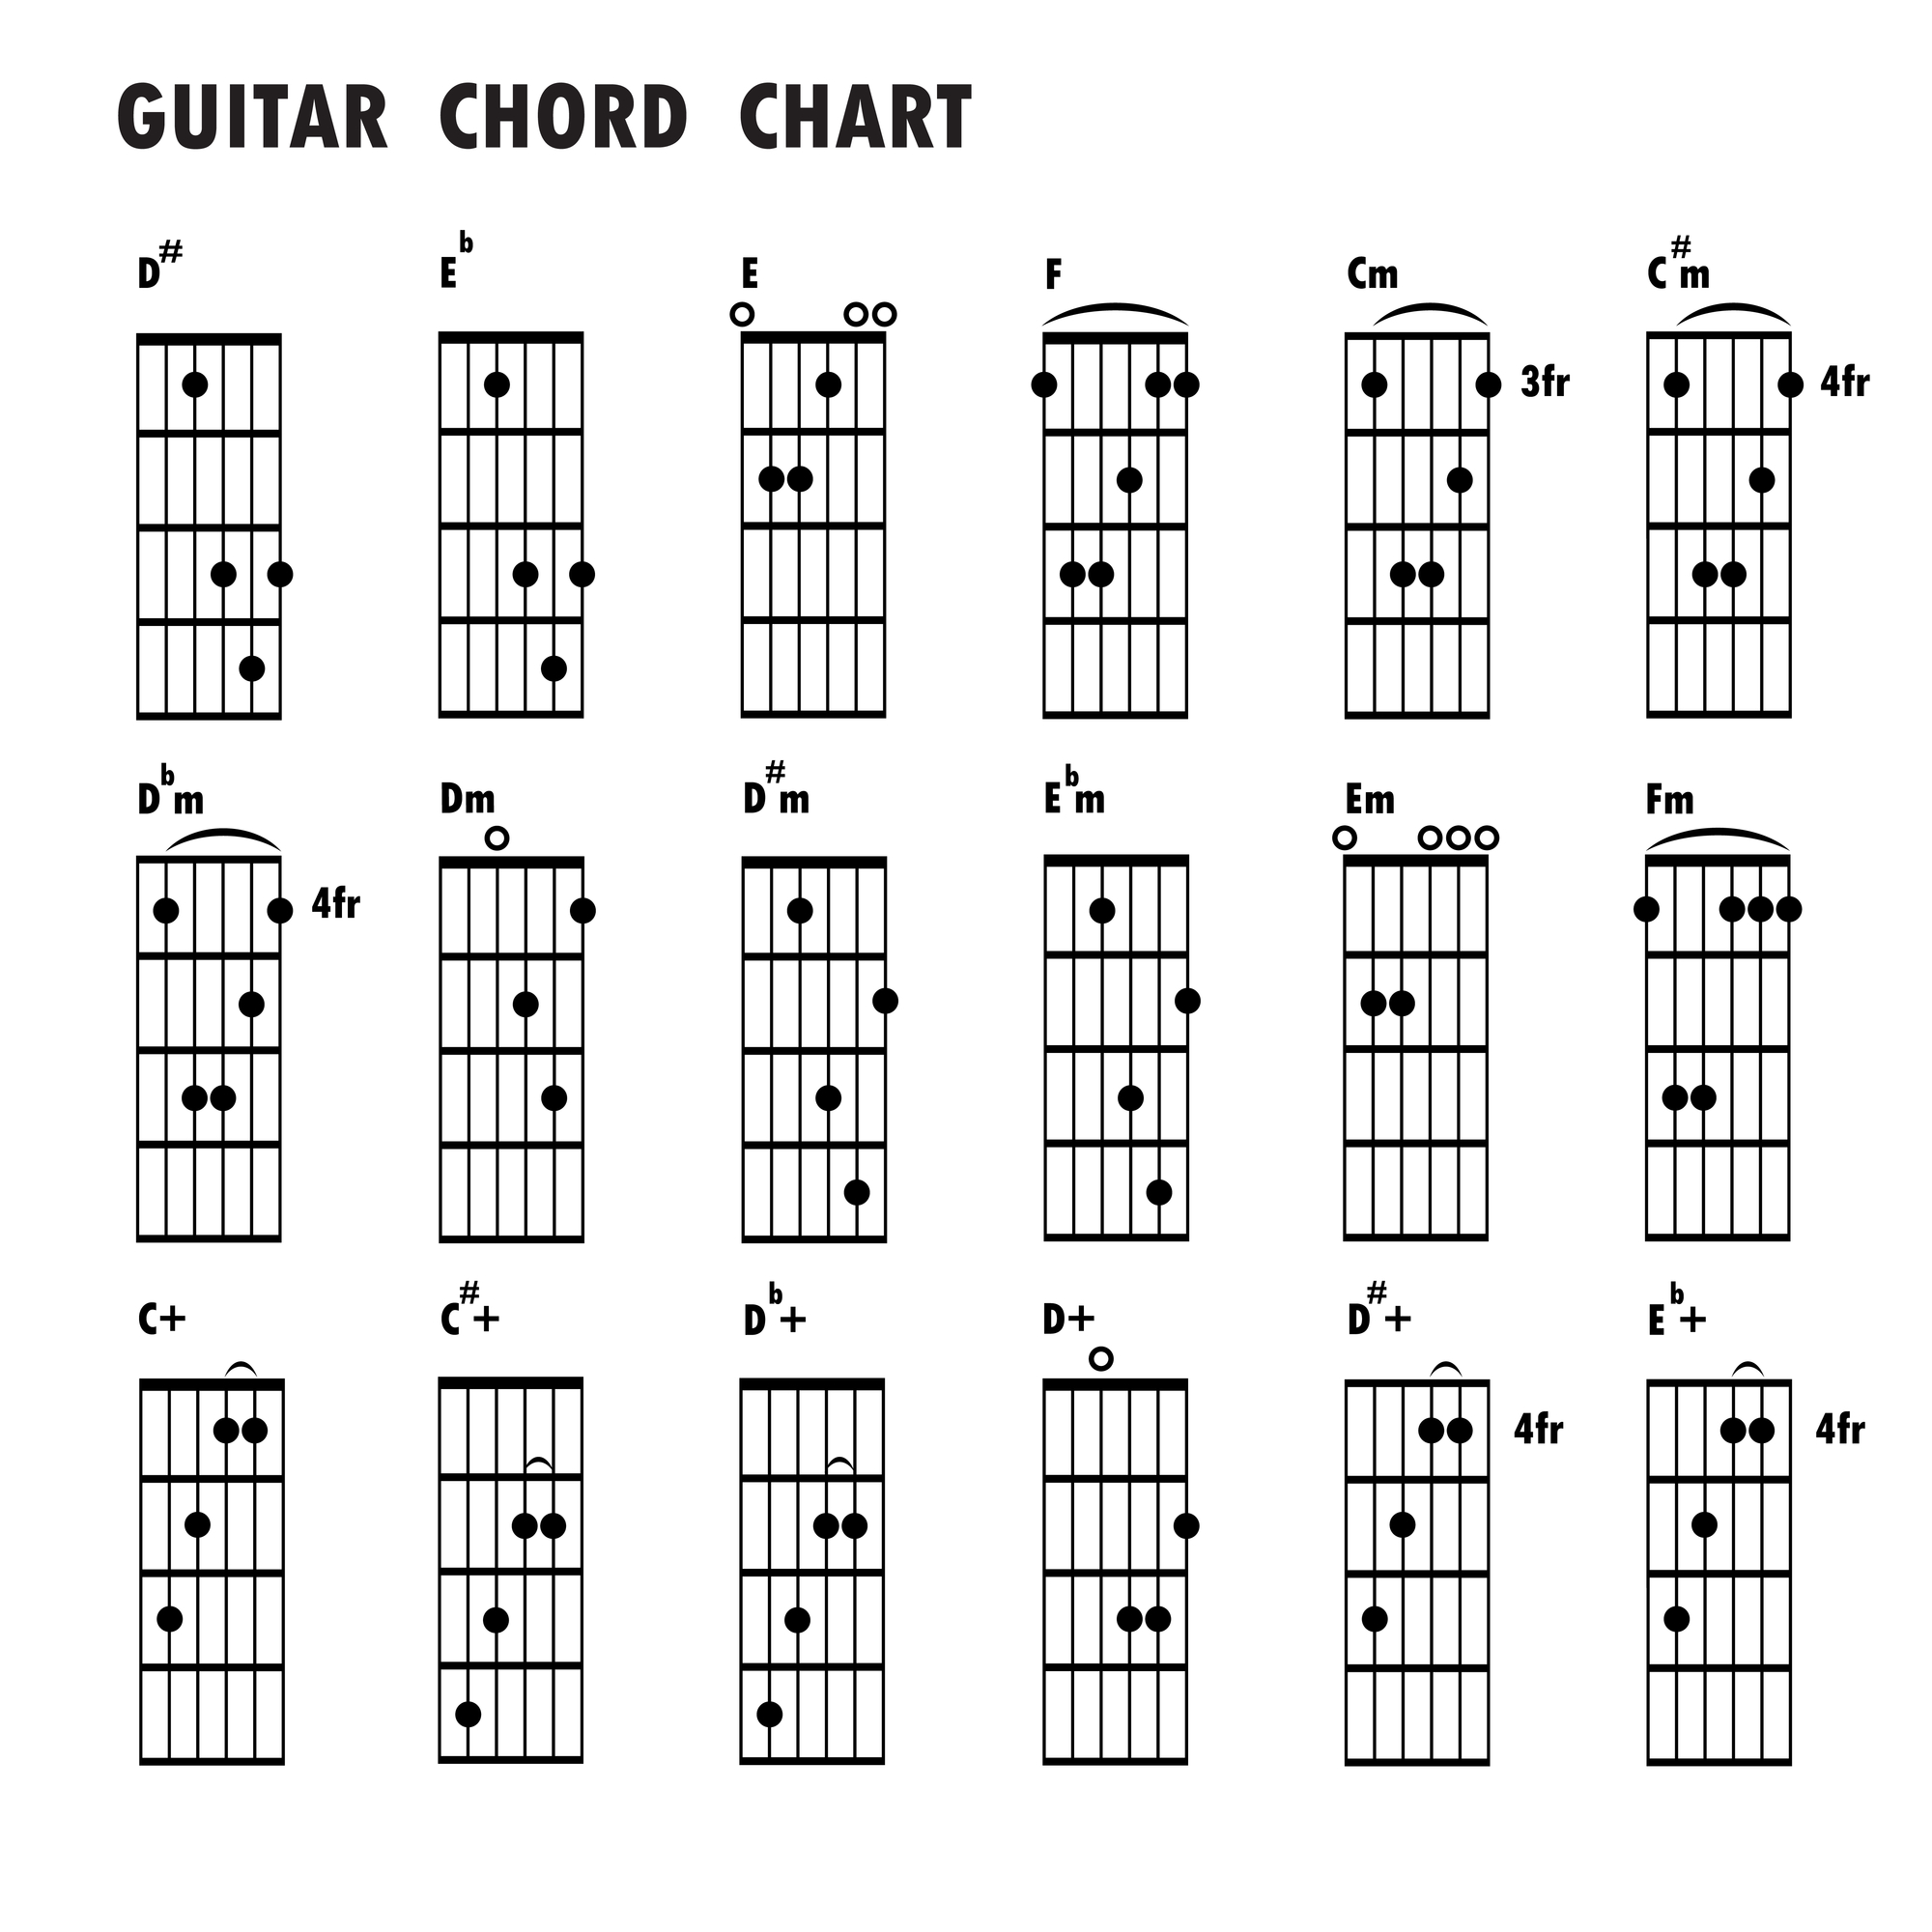
Everyone has different sized hands, which means that a certain fingering for a G major chord may work for some, and others may find it too much of a stretch.
One of the important factors of being able to change smoothly between chords is being able to comfortably play those chords first. Take some time to try out different fingerings for each chord and find a few that suit you. Notice how I said, “find a few.” You always want to have a few different fingerings as the ease of switching between different chords often lies in the fingering.
For example, playing a G major like this (pay attention to fingering numbers) will make it easier to switch to a D major.


However, playing a G major with this fingering will make it easier to switch to a C major.


Try these chords out and you’ll see what I mean.
When you explore different fingerings for your chords, you also want to take anchor fingers into account.
Try to have as many anchor fingers as possible between your chords as that will make your chord changes infinitely smoother.
Here is a video I created on anchor fingers:
3. Timing: changing chords at a steady rhythm
The final piece to developing good technique is to perform your chord changes with a steady rhythm. Even when you’re picking up a new chord change and you’re going very slowly, try your best to stick to a steady pace. Once you feel comfortable enough going slow and steady with just your own sense of timing, it’s time to add in a metronome to help you keep time at faster speeds.
It is vital that you get a metronome as this is the only tool that can help you reliably increase the speed of your playing. You can find several different metronome apps on the app store for free, so pick one and learn how to use it.
Now that we’ve laid the foundation of improving your chord changes, let’s check out some exercises that will bring us to the next level!
To change chords like a pro, always remember:
- Start slow: master the chords at a certain speed and then increase your pace to get consistently smooth chords
- Find chord fingerings that are suited for your hand size
- Stick to a steady pace when performing chord changes
Exercises
These exercises are designed to help you improve the speed and timing of your chord changes. Begin with the “Countdown changes” before moving on to the “Metronome changes.”
1. Countdown changes
The first exercise is very simple. All that is required is a timer.
- Begin by setting your countdown timer to 30 seconds.
- Pick two or three chords you want to practice changing between.
- Start the timer and begin changing your chords.
- Count how many chord changes you have done.
- Once you’re out of time, write down how many chord changes you did, and restart the whole process again.
- If on the next few tries, you have a higher number of chord changes, then you’ll know that you are improving.
- As you build up stamina, you can increase your timer setting too. Try 45 seconds or even one minute.
There is an issue with this exercise though: there is nothing forcing you to change your chords faster during the exercise which may result in stagnation of progress. In order to force yourself to perform the chord changes faster, you will have to use the next exercise.
2. Metronome changes
This exercise will require a metronome. If you haven’t downloaded a metronome app yet, I highly suggest downloading one now. If not, you can always type “metronome” into a Google search, and you will see Google’s very own metronome tool.
This exercise is much more effective than the first, because it requires you to be able to stay in time. With a metronome, you will be forced to stay at a certain tempo, which can be sped up to force you to perform your chord changes faster. The BPM set on the metronome will also give you a very clear indication of whether progress is being made or not. For example, if you start your practice at 60BPM and end at 120BPM, you’ll know that you’ve made some really good progress. However, at all times, remember the fundamentals: you always want to move in a smooth manner, so if you start to feel like you’re jerking your hand during the chord changes, you need to slow the metronome down.
At this point, you should have also planned which fingerings you’d like to use for the different chords.
- Set a metronome at a slow speed. 60BPM is always a good place to start.
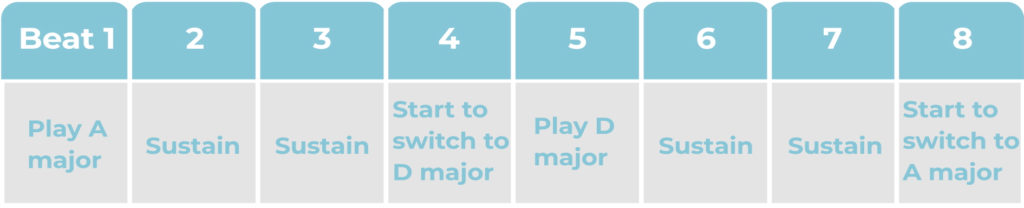
- Let’s say we’re switching between A and D major. Play and sustain an A major chord for four beats, then switch and play a D major chord. Once you’ve sustained the D major chord for four beats, switch back to the A major. If you find you’re having trouble getting to the next chord in time, begin switching your chord on the fourth beat as outlined in the following chart:

- Once it feels effortless, smooth, and relaxed, increase the speed of the metronome. Increments of 5-10BPM are what I like to do.
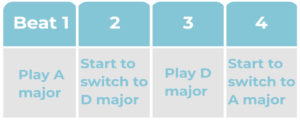
- Once sustaining a chord for four beats starts to feel too easy even at the higher speeds, switch over to sustaining every chord for only two beats. Remember to bring the metronome back down to a slower speed
- You can even play one chord per beat.

At all times, while performing these exercises, try to ensure that your chords sound clean without any bum notes. Always remember to maintain smooth and relaxed movements.
Here is a video that I made to demonstrate how to do these exercises.
The role of a rhythm guitarist
Work on these exercises and you will find that your chord changes will get smoother in no time. Remember that the point of working on exercises like these is to create smooth chord changes so your playing will sound consistent and in time. After all, that is the job of the rhythm guitarist - to provide a steady foundation for the music. If there are stutters in your playing, everyone else will sound bad too. So work on sounding great yourself, and those around you will start to sound great too!
About the Author: Ze

Ze first began his journey playing original music and top 40s pop tunes around the country's popular venues. Eventually, through the music of John Mayer, he found a strong attraction to blues music. Ze has years of experience teaching beginners and intermediate guitarists. Currently with Liberty Park Music he is teaching Introduction to Guitar Playing for Complete Beginners, Rhythm Guitar to learn about strumming, chords and more, Guitar Essentials as a fast-track review course, and lots of Song Lessons on pop and rock hits.


I think this very good advice and it works.
Ive tried to apply these principles to changing from G7 to f major barre chord but I find it very difficult to get it into any kind of rhythm it’s always feels like I’m stuttering no matter how much I practise it I can’t get it to feel secure as a non-bar chord.