
Barre chords are one of the trickiest techniques for beginning guitarists to master, but being able to play them is necessary for any rhythm guitarist. Mastering barre chords will allow you to play any major or minor chord, eventually making it possible for you to sight-read chord charts.
So, how do we master barre chords? If you follow the techniques presented here, with a little patience and a lot of practice, you’ll be able to master your barre chords in no time!
First up is the definition of what barre chords are so you can understand what it is you are doing. Next, I present you with the specific techniques of how to practice and play barre chords. Finally, I offer some alternatives that you can use until you master barre chords.
What are barre chords?
Barre chords are essentially “moveable” chords. The shapes of barre chords stay exactly the same, but the placement of your hand on the guitar neck depends on what chord you’re playing. All of our barre chords are essentially based off of the fingering shapes of four chords: E major, E minor, A major, and A minor. Pay special attention to the fact that the root notes of the E chords are on the sixth (lowest) string, and the root notes of the A chords are on the fifth string. Let’s use some images to help with this explanation.


Now, what I mean by “moveable” is that if we move the entire shape of the E major chord up one fret, we will have an F major chord. This includes the notes on the open strings.

Notice how the F major chord looks exactly like the E major chord, except every note is moved up one fret. Again, the note on the sixth string is the root note, so if you’d like to play F-sharp major, all you have to do is move the shape up so that the note you’re pressing on the sixth string is F-sharp.

The same concept applies to A shape chords. If you move the shape of the A major chord up to the second fret (where the B note lies on the fifth string), you will get a B major chord.
A helpful way to think about barre chords is that your index finger basically plays the role of a capo.
By now, you may start to see the potential of barre chords. Just think about it: with only four shapes and knowledge of what the notes are on the fifth and sixth strings, you can play any major or minor chord across the fretboard. They also allow you to sight read chord charts a lot faster. This is why the barre chords are one of those “game changing” techniques.
Barre Chords Practice Techniques
A Gentle Art
A common misconception with barre chords is that they are difficult because you have to use a lot of force to press down on the strings to produce a clean sound. The truth is, nothing about playing guitar should require a lot of force; the trick is knowing where to place your fingers, and placing them accurately. Conor McGregor, one of the great, living, martial artists famously said, “Precision beats power and timing beats speed.” In music, art, and many sports, being precise with your technique is more productive than trying to muscle your way through things, and having a good sense of timing often trumps being fast.
One factor that may prevent you from focusing on precision rather than power is your guitar’s setup. If you find that even playing a single note requires quite a bit of force, then you want to check out the action (string height from fretboard) of your guitar. If your strings are too far away from the fretboard, which is common on many new guitars, bring it to a professional to get it setup. It is also possible to do it yourself if you’re handy with tools.
Keep in mind as you practice barre chords that technique and finger placement are more important than force. If you find yourself pressing really hard on the strings, you need to stop and check in with what you are doing.
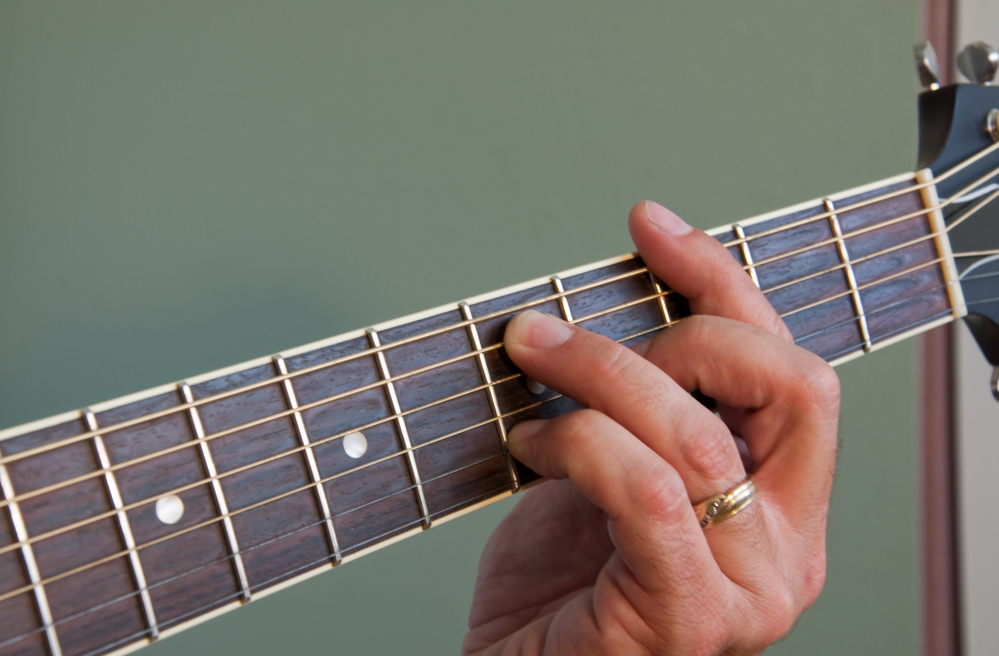
“E” shape barre chords (root notes on 6th string)
For barre chords that use the E chord shapes, remember that the root of the chord is on the sixth string. Use the following steps to practice the E major chord shape as a barre chord, beginning with the F major barre chord.
- Begin by placing your index finger on the strings directly above the first fretwire. Don’t press down yet.
- Tilt your index finger towards the nut, then press down on the strings. If your finger is pressing on the fretwire, move it slightly so it’s no longer pressing on the fretwire.
- The key is to press down on the strings with the outer edge of your index finger (not all the way on the side, but just slightly off centered).
- Place the other three fingers where they need to go.
- Remember to place your fingers near the fret wires to play effortlessly.
- Your thumb should be at the middle of the neck, right about where your index finger is. Think of how a vice holds things in place.
- Contrary to what you’d expect, the pressure down on the strings should not be produced by you squeezing the thumb and fingers together. Instead, imagine using the muscles in your back to slightly pull the neck towards you. Your thumb is only there to hold your hand in place, and should only be lightly squeezing. Very little force is necessary for this.
- The idea behind this is simple. The muscles in your back are obviously bigger and stronger and the small muscles in your hand will certainly tire out first.
- A common problem with this chord is the first and second strings don’t ring cleanly. If this happens, check that these two strings are being pressed down by the second knuckle of your index finger.
The F minor chord uses more or less the same technique as the F major, with a difference in only one note.

- In order to press down on the third string with your index finger as well, you will have to bend your index finger (towards the fretboard) right where the third string is.
- Play just the third string a couple of times to feel the exact spot.
- You can place your middle finger above the index finger to help it bend a little more.
Barre Chords Practice Techniques
A Gentle Art
A common misconception with barre chords is that they are difficult because you have to use a lot of force to press down on the strings to produce a clean sound. The truth is, nothing about playing guitar should require a lot of force; the trick is knowing where to place your fingers, and placing them accurately. Conor McGregor, one of the great, living, martial artists famously said, “Precision beats power and timing beats speed.” In music, art, and many sports, being precise with your technique is more productive than trying to muscle your way through things, and having a good sense of timing often trumps being fast.
One factor that may prevent you from focusing on precision rather than power is your guitar’s setup. If you find that even playing a single note requires quite a bit of force, then you want to check out the action (string height from fretboard) of your guitar. If your strings are too far away from the fretboard, which is common on many new guitars, bring it to a professional to get it setup. It is also possible to do it yourself if you’re handy with tools.
Keep in mind as you practice barre chords that technique and finger placement are more important than force. If you find yourself pressing really hard on the strings, you need to stop and check in with what you are doing.
“E” shape barre chords (root notes on 6th string)
For barre chords that use the E chord shapes, remember that the root of the chord is on the sixth string. Use the following steps to practice the E major chord shape as a barre chord, beginning with the F major barre chord.
- Begin by placing your index finger on the strings directly above the first fretwire. Don’t press down yet.
- Tilt your index finger towards the nut, then press down on the strings. If your finger is pressing on the fretwire, move it slightly so it’s no longer pressing on the fretwire.
- The key is to press down on the strings with the outer edge of your index finger (not all the way on the side, but just slightly off centered).
- Place the other three fingers where they need to go.
- Remember to place your fingers near the fret wires to play effortlessly.
- Your thumb should be at the middle of the neck, right about where your index finger is. Think of how a vice holds things in place.
- Contrary to what you’d expect, the pressure down on the strings should not be produced by you squeezing the thumb and fingers together. Instead, imagine using the muscles in your back to slightly pull the neck towards you. Your thumb is only there to hold your hand in place, and should only be lightly squeezing. Very little force is necessary for this.
- The idea behind this is simple. The muscles in your back are obviously bigger and stronger and the small muscles in your hand will certainly tire out first.
- A common problem with this chord is the first and second strings don’t ring cleanly. If this happens, check that these two strings are being pressed down by the second knuckle of your index finger.
The F minor chord uses more or less the same technique as the F major, with a difference in only one note.
- In order to press down on the third string with your index finger as well, you will have to bend your index finger (towards the fretboard) right where the third string is.
- Play just the third string a couple of times to feel the exact spot.
- You can place your middle finger above the index finger to help it bend a little more.
“A” Shape Barre Chords (Root Notes on 5th String)
For barre chords that use the A chord shapes, remember that the root of the chord is on the fifth string. I will use B major to explain the techniques needed for A shape barre chords.
There are two ways to play the B major barre chord:


The first version relies on your ring finger to press down the fourth, third, and second strings. The second version has a separate finger for each string. The first version is my personal preference for a B major chord because it requires only two fingers, which frees up my other fingers to do cool chord licks. However, it does take a little more time than the other version because the technique requires your ring finger to press down on three strings.
- Notice how you don’t actually have to barre anything with your index finger. It will only be pressing down on the fifth string.
- Place your ring finger across the fourth fret of strings four, three, and two.
- Make sure the first string is muted.
- Mute the sixth string by lightly touching it with your index finger. Some people press down on it instead, but I don’t like the sound of that because it makes the chord sound a little muddy, and the root note is no longer the lowest note being played.
The technique for a B minor chord is very similar to the F major chord. Even the shape looks similar.

- Notice its exact same shape as the F major chord, except the root note is now on the fifth string, and the entire shape is moved down one string.
- As usual, pay attention to where the root note is, which allows you to shift your barre chords up and down the fretboard.
Quick Switching
Once you’ve played around with these four chords, you’ll want to try some chord changes between your barre chords. When you do so, remember to always release pressure off the strings during chord changes. In some situations, you might want to keep the pressure on, but for now, practice taking the pressure off first. Additionally, if the chord you are switching to has the same shape as the chord you are switching from, keep your fingers in that shape as you slide up or down.
Memorizing Your Root Notes
After you’ve worked on getting your barre chords nice and clean and are able to switch smoothly between them, the only thing that’s left is to memorize all the notes on the fifth and sixth strings. It may sound like quite a bit of work, but it can be done in a day or so.
One thing to remember is that you really only have to memorize the notes up to the 12th fret, because the notes onwards are repetitions of those from the open string to the 11th fret. For example, the note on the1st fret is the same note as the note on the 13th fret, except the 13th fret is an octave higher. If your fretboard has inlays for fret markers, they show you where the octave notes are. For example, most guitars have a marker on the 3rd and 15th fret. Those two notes are the same, but an octave apart. The same thing can be said for the 5th and 17th fret.
I use a simple exercise to memorize the notes on the fifth and sixth strings. It focuses on where the natural (no sharps and flats) notes are.
- Ascend up the sixth string and only play the natural notes while saying them out loud.
- Descend down the sixth string and play only the natural notes while saying them out loud.
- Do the exact same thing for the fifth string.
- Make sure you’re playing the correct notes while doing this exercise.
Sixth string natural notes:
- E on open string
- F on 1st
- G on 3rd
- A on 5th
- B on 7th
- C on 8th
- D on 10th
- E on 12th
Fifth string natural notes:
- A on open string
- B on 2nd
- C on 3rd
- D on 5th
- E on 7th
- F on 8th
- G on 10th
- A on 12th
Easy Alternatives
There are easy alternatives to the F major, F minor, and B minor chords, but you should use them only when you are still learning the barre chords. I can’t stress enough the importance and usefulness of the barre chords. Remember that you’ll be able to play almost any song after you’ve learned your barre chords, so practice them well and aim to master them.
That being said, here are some easy alternatives:


A couple of things to note:
- Pay attention to what strings need to be muted throughout all three alternatives. The sixth string can be muted with the tip of your ring finger for F major and F minor chords.
- The F minor alternative still requires you to barre with your index finger, just that it’s now only across three strings. Use the same techniques for regular barre chords.
- The B minor alternative is actually a B minor7 chord. The tonalities of these two chords are very similar.
Final Word
It will take you some time to master all of your barre chords. Treat this article as three or four different articles. Spend time on the concepts in the first section until you’ve mastered those ideas. Then move on to the second section, and so on. You will want to come back to this article often to remind yourself of what you still have to work on and the technical details.
Some of the details that most people forget are to use the side of your index finger for your F major, F minor, and B minor chords and to put pressure on the strings by pulling back with the muscles in your back. Remember that the pressure down on the strings is not accomplished solely by squeezing your thumb and index finger together. You will end up with a sore hand if you do this.
Finally, learning and mastering your barre chords is a true test of your patience. A lot of guitar playing techniques do not come easily or quickly, and the barre chords are the first of such techniques. Focus on where you are instead of where you want to be to avoid impatience and frustration. The thing that matters most on the path to playing music is not the obstacles that we face, but how we respond to these obstacles. Master your reaction to them, and you will develop the patience of a monk. In other words, the only obstacle on this path is yourself. Remember that barre chords, once mastered, will open up so many possibilities for your guitar playing.
Check out the video version of this lesson below.
If you’re looking for more, feel free to check out the online guitar courses on Liberty Park Music!
Improve your guitar playing with more articles like this!
Free monthly guitar tips and advice delivered straight to your inbox!
About the Author: Ze

Ze first began his journey playing original music and top 40s pop tunes around the country's popular venues. Eventually, through the music of John Mayer, he found a strong attraction to blues music. Ze has years of experience teaching beginners and intermediate guitarists. Currently with Liberty Park Music he is teaching Introduction to Guitar Playing for Complete Beginners, Rhythm Guitar to learn about strumming, chords and more, Guitar Essentials as a fast-track review course, and lots of Song Lessons on pop and rock hits.


