

In the first two lessons, we have covered the basis of C major in the first position. All the songs we will learn in the course will stay in this position. To practice what we have learned, With or without you is a great song to start with, as it uses only four chords and has a simple melody using the C major scale. Before we practice any of the songs, make sure to warm up by playing the exercise in the last lesson, in which we play the scale over each chord.
With or Without You uses the progression I V vi IV in the key of C, which gives us the chords C, G, Am, F. So start by playing the scale over these four chords, ascending and descending. With vocal melodies, the rhythm is often changed up by the singer or soloist to add feeling to the song. You may notice the rhythm in the arrangement has been simplified; once you have mastered the arrangement, you will be able to stretch rhythms artistically. At this time, the most important thing is to play the harmony and melody together and keep all strings ringing. Once we have achieved this, we can start adapting the rhythm of the melody.
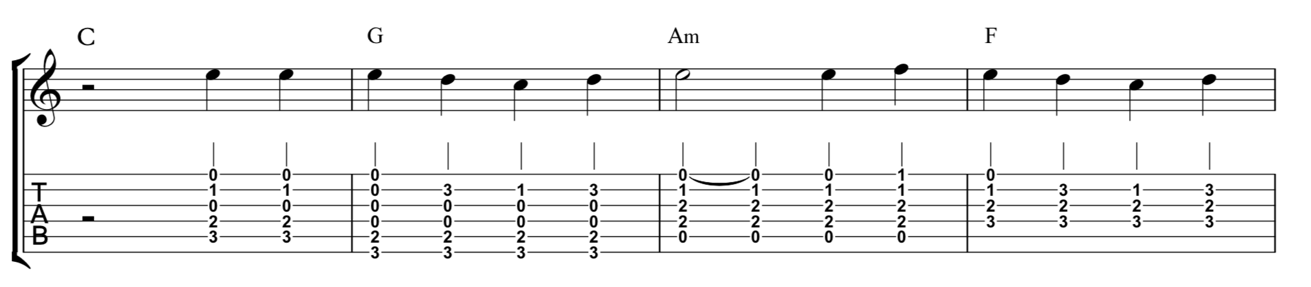
The first phrase contains only four notes. Be sure to strum every quarter note, which is our pulse. The first two notes are E; this is easy, as E is on the top of the C major chord shape, which we know already, so simply strum this chord. You can also accentuate the note E by strumming the chord and digging the pick in slightly harder when you get to the the high E string.
The E then stays in the melody at bar two, but we must change to a G chord. Remember to change the fingering for this shape: use your third finger to fret the root (G, 3rd fret of E string) and your second finger to fret the B (2nd fret of A string), which frees up other fingers to play the scale. Simply play this G chord and, again, let the high E ring loudest as this is the melody. Follow this by strumming again but with the note D on top, using your fourth finger, and then with the note C using your first finger and back to D. Remember that we have learned all of these movements in the previous lesson and are now applying them to a melody.
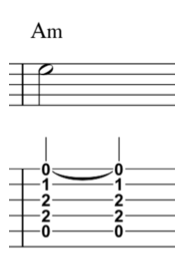
The A minor, like the C, contains the high E naturally occurring in the chord shape, so we can play our normal A minor chord but remember to accentuate the high E, again because this is the note in the melody. Unlike the others, this note is a half note, so it is held for two beats instead of one. In order to keep our quarter note pulse going in the harmony, we will need to strum again on beat two but, instead of hitting the high E, keep it ringing from the previous strum, which may take some practice. This is symbolised by a tie in the tablature.
The note F (4th beat of the Am) can be achieved by flattening the first finger across the first fret of both the B and E strings. We then approach the F, like in the exercise in the previous lesson, by letting the open high E ring and using our fourth finger for the note D. Practice each bar individually and slowly to get the correct notes ringing freely. When you are comfortable with the finger movement, start incorporating a metronome and strumming on each click.
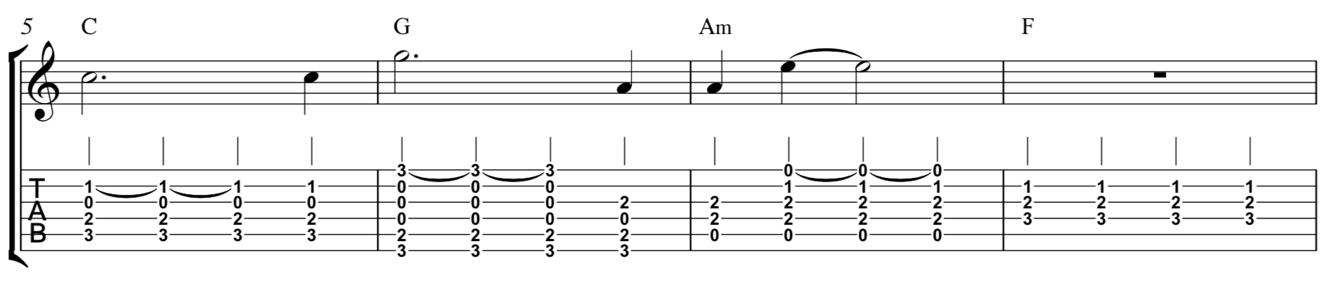
In bar five, we have a dotted half note for the note C. This means we need to hold this note in the melody for three beats. Since we are strumming the chords as crotchets, we need to strum three times with the note C ringing. For the fourth beat of the bar, we will play the note C with the chord again. A similar thing happens in bar six, except we are holding the note G over a G chord. The fourth beat contains a tricky chord, a G with the note A in the melody. Practice changing between this chord and the first chord of bar seven (Am) until it becomes easier. There is no melody in the eighth bar so we can simply strum the quarter notes using the F chord.
Learn with LPM
If you are looking to feel comfortable with playing basic major and minor chords, power chords, and apply different strumming techniques to your practices with Ze, check out his course called Rhythm Guitar
Bars 9-15 repeat the same melody. Bar 16 has the lead in to the chorus, this is where we introduce eighth notes. This will be tricky because, although the melody is using eighth notes, we are still going to be strumming the chords as quarter notes to keep the pulse. Practice bar 16 until you are able to play both the chords and the melody evenly. For the first two beats, we play the chord as quarter notes (downstrokes); then for the second two beats, we will do the same except an upstroke between each downstroke and play only the melody note on the upstroke.
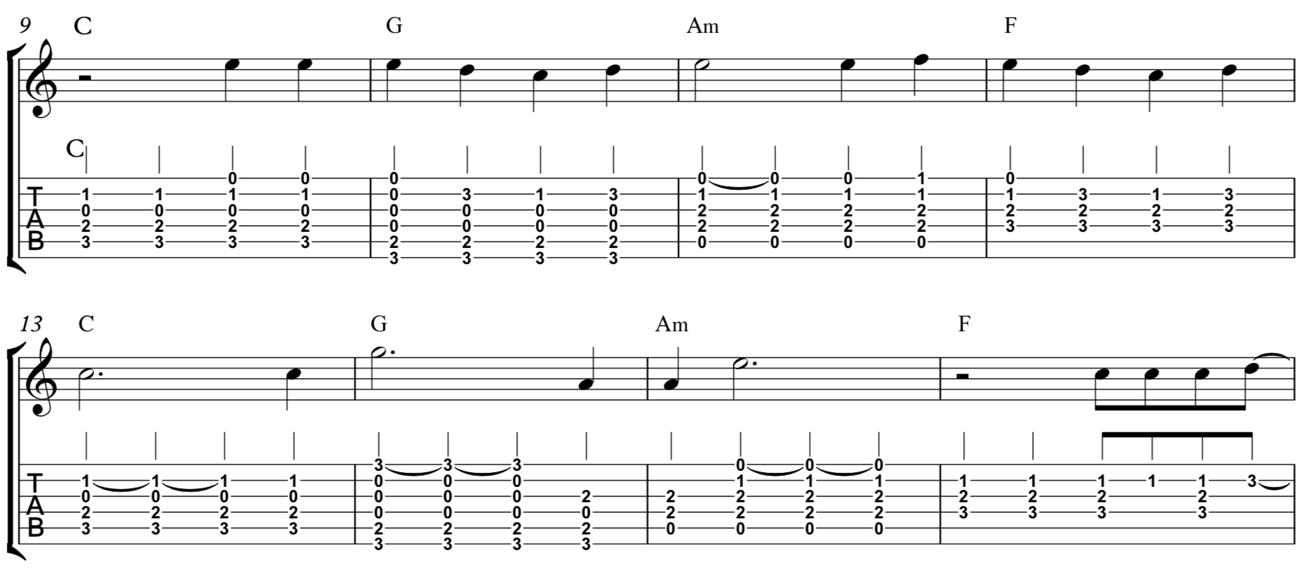
The last note of bar 16 and the first not of bar 17 are tied, the most complex technique in the arrangement. What makes this complex is that we will need to change chord whilst holding the melody note, keeping it ringing whilst we arrange our fingers. For detailed instruction on this part, check out the video tutorial. Although the melody is tied, we must keep strumming the quarter note in the chords. You will notice another tie between bars 18 and 19 and again between bars 22 and 23.
Putting Solo Guitar to Practice
Solo guitar arrangements are very different from learning chords, riffs, or just melodies. They often mimic two or more instruments, meaning our brain needs to be thinking in two different roles at once, such as the quarter note pulse in this arrangement, which provides the harmony and rhythm of the song coupled with the melody. When we combine these two roles, we end up with difficult passage where rhythms clash, for example the ties in this arrangement. It’s important to single out these passages and practice them slowly. Once you have understood how the fingers should move, use the metronome at a speed you can comfortably play the passage and then gradually increase the speed.
Once you have this arrangement under your fingers, experiment with the rhythm, add some fingerpicking, or introduce techniques that you have learned. The great thing about a simple arrangement like this is that you can make it your own with a little bit of experimenting. Stay tuned—the next arrangement in the course is the Bob Marley classic No Woman No cry.
More About the Teacher

Rowan Pattison is an Australian jazz and contemporary guitarist. His resumé boasts artists such as American singer Bobby Arvon (Happy Days), Broadway star Michelle Murlin, American Idol finalist Lou Gazzara, Marcus Terrel from America’s Got Talent, Vegas Trumpet prodigy Greg Bohnam and American Comedian James Stevens III, who is featured regularly on The Tonight Show and Comedy Central. Now based in Melbourne, Rowan has just lead his own trio concert Impressionism of Bill Evans on a tour of Europe playing concerts in Kyiv, Lviv, Krakow and Paris. Rowan's guitar courses with Liberty Park Music include the Introduction to Jazz Improvisation and Introduction to Solo Guitar.


