
One of the first skills that all guitarists learn is how to read a chord diagram. These diagrams are very helpful when it comes to showing chord shapes and their fingerings. Fortunately for us, it’s also a very easy skill to pick up and you’ll be reading chord diagrams like a pro by the end of this article!
What Does a Chord Diagram Look Like?
Most chord diagrams will look very similar to the following image:

Before getting into what all those numbers, dots, and letters mean, let’s take a look at a blank diagram and break that down first:
![]()
Beginning at the very top, the thick black bar represents the guitar’s nut (the white, sometimes cream colored, or black, object at the top of the fretboard on the guitar that elevates the strings over the fretboard):

The boxes that follow below the nut represent the different frets. The first row of boxes represent the first fret, the second row represents the second fret, and so on
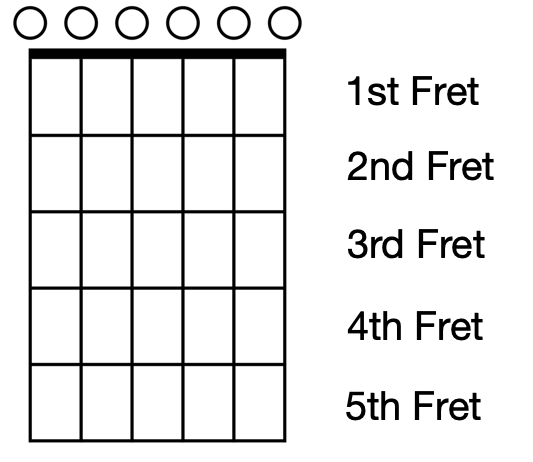
The vertical lines that run down the diagram represent the six strings on the guitar. The leftmost line represents the sixth string, which is the thickest string and the one that is closest to your head; on the opposite side, the line all the way to the right represents the first string, which is the thinnest string and furthest away from your head.

Now that we have gone through a blank diagram, let’s find out what those numbers underneath the diagram mean.
What do the Numbers Mean?
The numbers are telling you which finger you are going to use. The fingers on your left hand are numbered from one through four. Here is what each number represents:
1 - Index Finger
2 - Middle Finger
3 - Ring Finger
4 - Pinky Finger
Occasionally, you will see a “T” symbol instead of numbers. In this case, that symbol is telling you to use your thumb to fret that particular note.
What about the Dots?
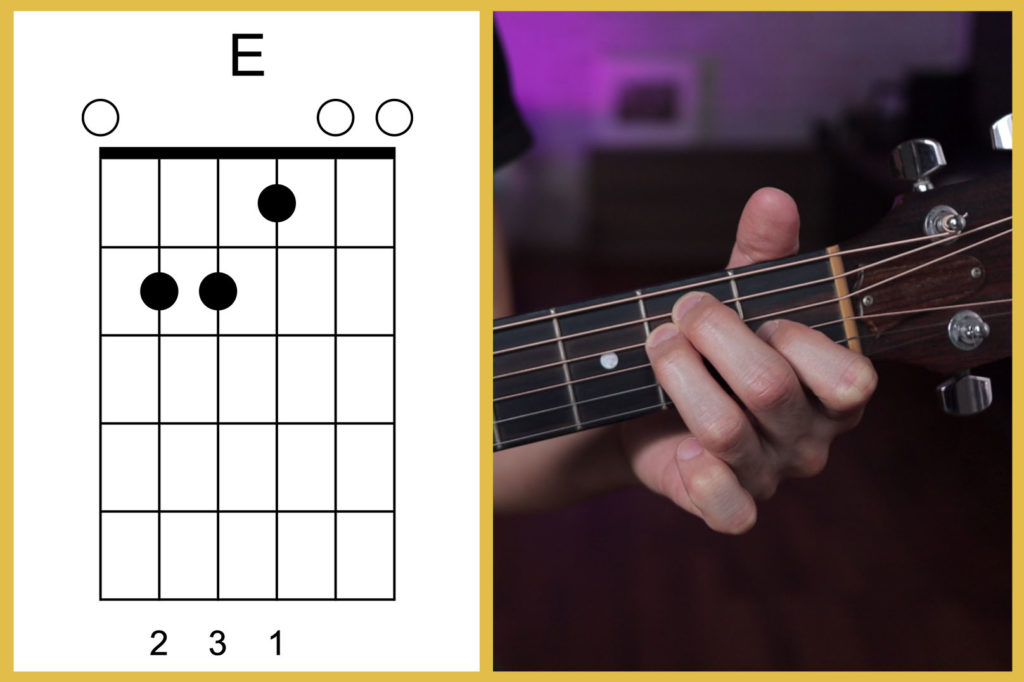
The black dots found on the chord diagrams tell you which fret to press down, and on which string, and with which numbered finger. Additionally, you will sometimes see circles above the nut. These circles tell you to play that open string without pressing any fret. So using what we know so far about strings, finger numbers, and dots, let’s check out the above same chord diagram again:
Based on the information given in this diagram, we will place our middle finger on the second fret of the fifth (A) string, ring finger on the second fret of the fourth (D) string, and index finger on the first fret of the third (G) string. Since there are circles above the sixth (E), second (B), and first (E) strings, we will also play those open strings.
Here is what this chord looks like on the fretboard:
What are the Letters above the Diagram?
If we follow the previous diagram exactly as it is displayed, we will create an E major chord. The large “E” above the diagram simply represents the chord that we are currently playing. These letters can get really complicated, but as a beginner, you will most likely be playing basic major and minor chords for a while.
Learn with LPM
If you are looking to review your guitar basics like tuning, setup, reading TABS etc. with Ze, check out his Intro to Guitar Playing Course for Beginners.
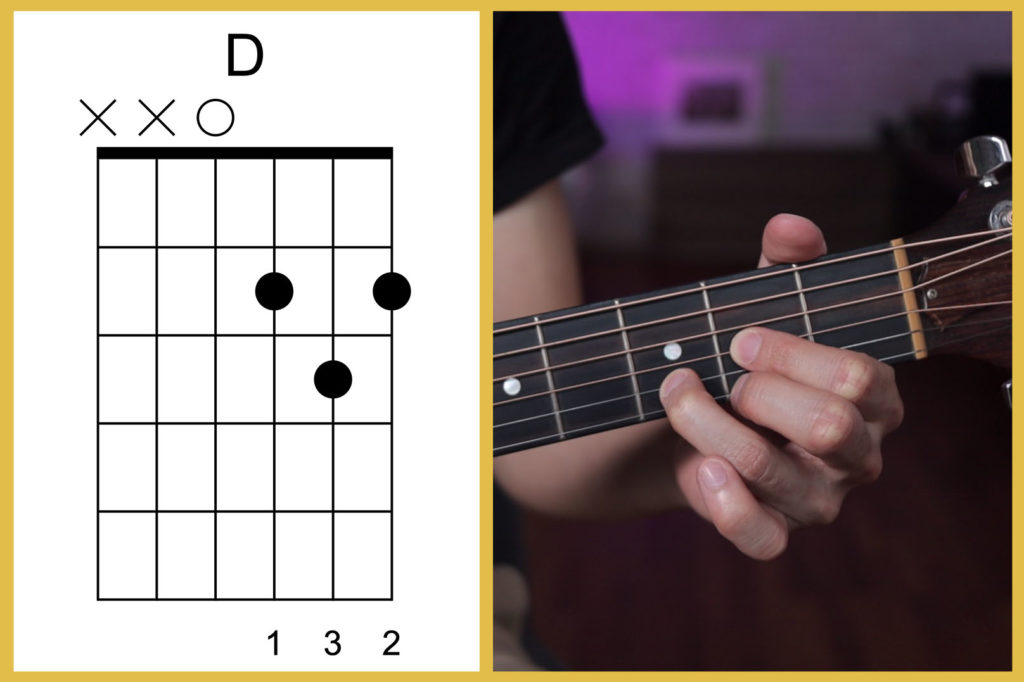
What does the "X" mean?
Often, you will see X’s above the nut instead of just O’s. These X’s tell you that you should not play that string for the current chord:

In this diagram, we will only play strings four, three, two, and one. Strings five and six have X’s above them, which means we will mute them, or avoid striking them with our pick (or fingers).
Here's what the D chord above looks like on the fretboard:
What do Barre Chord Diagrams look like?
For those of you who have gotten into playing barre chords already, here is what a barre chord looks like:

Here is an F major barre chord.
The straight line at the top of the chord diagram lets you know that you will have to use a barre technique to play this chord. If you’re curious about barre chords, please check out this article.
Here is what this chord looks like on the fretboard:

What chords above the Fifth Fret?
As you progress beyond open chords (chords with notes on open strings), you will encounter chords with notes above the fifth fret.

In this Eb minor chord diagram, you will notice a “6fr” symbol to the right of the diagram. This is to tell you that this diagram begins on the sixth fret. Occasionally, you will see symbols like “VI” or just a “6” to let you know that the diagram begins on the sixth fret.
Here is what this chord looks like on the fretboard:

You're Ready to Play!
That’s really all there is to it. It’s a very simple and easy to grasp concept, but in order to remember and master this concept, you will have to practice! There are also a number of chords that will be useful for beginners to learn which I have included below. Once you’ve gotten the hang of these chords, check out our article on common guitar chord progressions to learn how to play hundreds of songs with just a few chords. Another great article that you should check out is one on how to use a capo. Understanding the capo will allow you to play almost any song on the planet with only 14 chords!
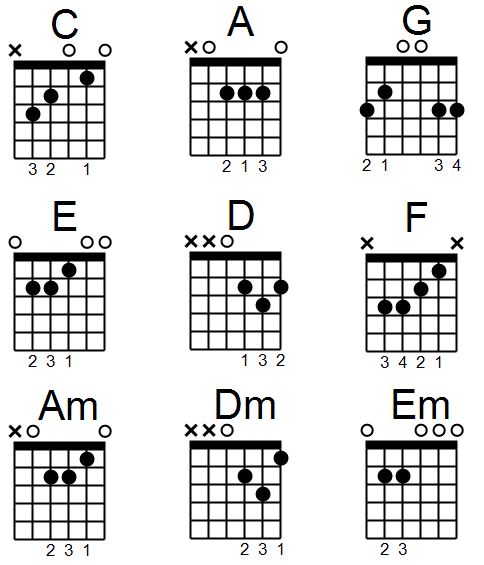
Essential Chords
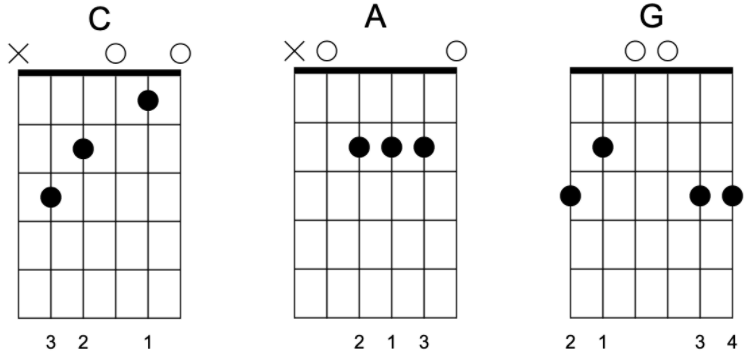
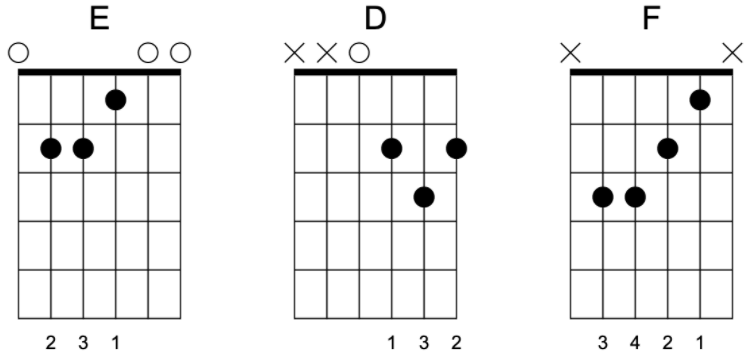
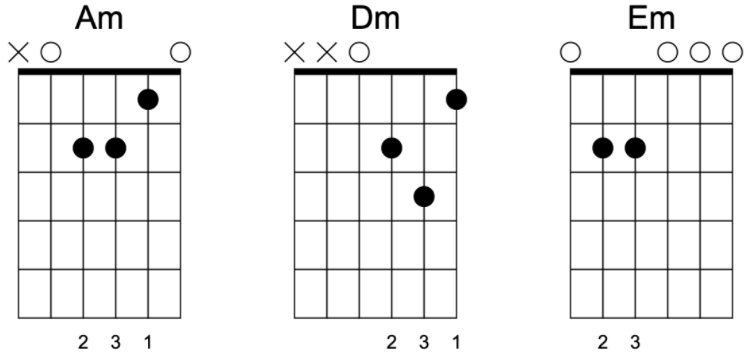
These nine chords are considered the essential beginner chords because they don’t require any barre technique to play, and if you combine these chords with a capo, you’ll be able to play hundreds of songs. So spend most of your beginning months mastering these chords first before moving on to more advanced chords.

About the Author: Ze

Ze first began his journey playing original music and top 40s pop tunes around the country's popular venues. Eventually, through the music of John Mayer, he found a strong attraction to blues music. Ze has years of experience teaching beginners and intermediate guitarists. Currently with Liberty Park Music he is teaching Introduction to Guitar Playing for Complete Beginners, Rhythm Guitar to learn about strumming, chords and more, Guitar Essentials as a fast-track review course, and lots of Song Lessons on pop and rock hits.


Very usefull website to learn guitar chords
Thanking you for the comprehensive guiter lessons that you shared. As a complete beginner, your lessons were very useful to me. So much so that I added the lessons to my homepage.
thanks very much.you have helped me so much. and easy to understand. I hope to learn the guitar well.
One of the best articles for the Beginner. Thanks for publishing.
Great , Our son Aman has got basic ideas through this article. Thank you .
Thanks a lot…
It was really helpful.